Wednesday, February 29, 2012

Oatmeal Carmelita Bars

The last lonely Oatmeal Carmelita Bar.
I'm here today to throw some sugary goodness in yo' face. Yeah, yeah, I hear you out there...But Katy, swimsuit season is almost upon us! You expect us to eat sweets at this crucial juncture in our lives??? For those of you in serious fitness mode, please click here and prepare for some serious booty-shaping, bicep-toning, sweat-dripping intensity. Warning: After completing this workout you will either hate me forever for directing you here or you will be dead.

For the rest of you, please follow me to sugar heaven.

Here is a pet peeve of mine...when a recipe calls for half a can/package/box of something I would never buy otherwise. Oh, I need three tablespoons of milk powder? A half ounce of dried mushrooms? A pinch of saffron? Let me just grab that from the pantry. Not.

I share this little pet peeve today because this recipe does in fact call for half a can of evaporated milk. Sheesh. However, I've done the leg work for you and found another delicious recipe that ALSO calls for a half can of evaporated milk. Wow, I'm so thoughtful. :)

Caramelized Chicken with JalapeƱo Cream

I made this chicken dish a while back and it was pretty awesome and come together super fast. If you like spicy food be sure to leave some of the seeds in your jalapeƱos. I ended up wishing mine was spicier. And you healthy folk who just followed that link up there and hate me now because I told you to do the hardest workout ever known to man? This is pretty healthy and bikini bod friendly so I hope we can be friends again.

Anyways, back to sugar and fat. These Oatmeal Carmelita Bars are super sweet. A little goes a long way with these suckers but I cut mine big anyway. I like to live dangerously. :) Whip up a batch in celebration of Leap Day! It only comes once every four years so go ahead and indulge. :)

Oatmeal Carmelita Bars

Ingredients:
2 cups all-purpose flour
1 teaspoon baking soda
¼ teaspoon salt
1 cup butter, at room temperature
1½ cups light brown sugar
2 cups quick-cooking oats
14 ounces caramel candies, unwrapped
½ cup evaporated milk
1 cup semisweet chocolate chips
1 cup chopped pecans

Directions:
1. Preheat oven to 350 degrees F. Butter a 9×13-inch baking dish; set aside.

2. In a medium bowl, whisk together the flour, baking soda and salt; set aside.

3. Using an electric mixer, cream together the butter and brown sugar on medium speed until combined and fluffy, about 3 minutes. Reduce the speed to low and slowly add the flour mixture until fully incorporated. Add the oats and mix on low briefly to just combine.

4. Transfer approximately half of the dough mixture to the baking dish. Spread and press the dough into the baking dish until you have an even layer with no cracks or crumbles. Bake for 10 minutes, then remove from oven.

5. While the dough is baking, combine the evaporated milk and caramels in a small saucepan over medium-low heat. Stir the mixture constantly until all the caramels are melted and you have a thick sauce. Allow to cool until cookie base comes out of the oven.

6. Once out of the oven, sprinkle the cookie base evenly with chocolate chips and pecans, and then carefully pour the caramel sauce over the cookie base, nuts, and chocolate. Use an offset spatula to spread the caramel sauce into an even layer.

7. Sprinkle the remaining cookie dough over the top of the caramel-chocolate-nut mixture a handful at a time, making sure to get an even coating over the whole dish.

8. Return the dish to the oven, baking until the topping is lightly browned, about 15 minutes.

9. Once out of the oven, cool the dish to room temperature and then refrigerate at least 2 hours or overnight. Cut into 2-inch squares and serve. Store leftovers in an airtight container at room temperature or in the refrigerator.
Serves 24
Source: Brown Eyed Baker, originally from Bluebonnets & Brownies

Tuesday, February 28, 2012

Study Update: Take 2

Elizabeth Chaise
Say hello to my leetle friend. My chaise lounge was finally delivered this past Friday and I have been putting it to good use already! Ever since I moved in to this apartment, I have been wanting to make the second bedroom into a study that I would actually use. And, now that I have somewhere comfy to sit while I do homework/grade/blog/Pinterest, I have been in this room non-stop!

I also want to take a moment to point out how awesome Momma K is, as if you didn't already know. I had some fabric leftover from this fabric-covered bulletin board so I sent her the extra fabric and an existing (but ugly) pillow cover and she made me this cute pillow cover to match my blue and white color scheme.

New Pillow Cover
Now that I have a place to sit my study project is almost done. I can't wait to show you all the finished product! However, I'm stuck on one final issue. I can't seem to decide on an area rug. If you know me, you know the painstaking search I was on last summer for a living room rug. Ugh. Apparently, when it comes to area rugs, I have major commitment issues. But, living in an apartment fully outfitted in hardwood floors, tile, and linoleum, rugs are a must.

So, in an attempt to avoid my own personal area rug indecision, I have brought my issues here. Please. Help me. I need a rug intervention. Here are my current best options:

Urban Outfitters Herringbone Rug in Navy $74
I really love, love, love the herringbone pattern on this rug! It would go well with the geometric pattern on my throw pillow. At 5'x7' it's a pretty decent size. And I do adore that price tag. However, I'm worried that the color might be a bit dark.

Hand-Hooked Miff Ivory/Blue Wool Rug $79.89
This is another option I found on Overstock. At 3'9"x5'9", it's a bit smaller but not too small for the room. Again, I like the pattern on this one but a few of the product reviews noted that the colors are not as pictured online: the ivory is more of a beige and the blue is not as bright. Not cool.

Ironwork Trellis Dhurrie Rug $159
Last but not least, this option from Shades of Light is definitely my favorite. The pattern and the colors are both perfect! However, the price tag is a bit more than I was hoping to spend and at 3'6"x5'6" this one is the smallest of the three. Boo hoo.

So, there you have it. My own personal area rug hell. First world problems, no? So, I put the decision to you. Thoughts, advice, other possible options, disapproval, criticism, cash or money orders...send it all my way! :)

Monday, February 27, 2012

Tuscan Bean Soup and Focaccia Bread

Tuscan Bean Soup
Every year it is the same. All summer, I look forward to fall and winter. A time when I get to bust out all my cute sweaters and boots and layer to my heart's content. A time for me to bake pumpkin-flavored everything with reckless abandon. A time when holidays come in such abundance one barely has time to redecorate between festivities. I love it all. Until February 15th, that is.

You see, now that Valentine's has passed, I have but one thing on my mind. Spring. A time when I become reunited with white pants, sandals, pastels, and tank tops. A time when fruit and vegetables come back in season. A time for tax returns and tax return-funded shopping. :)

Yet, as much as I've been wishing for spring, Mother Nature decided to send some snow and brutal winds my way this past weekend. Grrr. So, I decided to embrace what I am hoping was the last of my New England winter and make one last winter meal.

Question: What winter meal is best?
Answer: Soup and homemade bread. Obvi.

This Tuscan Bean Soup is quick and easy. This Focaccia Bread is not, but you should make it anyway. This Focaccia Bread is definitely in the Top 10 of Best Recipes Ever...a very scientific and objective compilation of amazing recipes created in my mind for this very post. Don't be intimidated by the length of the directions. Most of it is down time, waiting for the dough to rise. Plus, I made this dough by hand so if you happen to own a stand mixer, no excuses. Also, I envy you.

Focaccia Bread
Side note: the herb oil from this recipe easily makes enough for two batches of Focaccia Bread so you might consider either halving the herb oil ingredients or just save the extra for another batch of bread! Clearly, I endorse option number two.

So, without further adieu, I give to you one complete winter meal. Make it, love it, and then pray for spring with me.

Tuscan Bean Soup

Ingredients:
2 cans white beans, drained (Cannellini or Great Northern)
1 c. onion, chopped
3 medium carrots, diced
2 cloves garlic, minced
2 tablespoons olive oil
8 ounces deli ham, chopped (preferably uncured)
3 c. chicken broth, divided
½ teaspoon dried thyme
½ teaspoon dried marjoram
½ teaspoon dried rosemary
⅛ teaspoon black pepper
⅛ teaspoon crushed red pepper
1 cup Italian diced tomatoes
Salt, to taste

Directions:
Saute onion, carrots and garlic in oil in a large saucepan until onions are lightly browned, 5-8 min. Add ham and saute 2 minutes longer. Add 2 cups broth, herbs and peppers.

Process one can of beans and remaining 1 cup broth in blender or food processor until smooth; add to soup and heat to boiling. Reduce heat and simmer, covered, 35-45 minutes, stirring frequently. Add remaining beans and tomatoes with liquid; simmer 10 minutes more. Season to taste with salt.

Serves 6
Source: Perry's Place, originally from 1001 Low-Fat Soups and Stews


Focaccia Perfection
Focaccia Bread

For the Bread:
5 cups high-gluten or bread flour
2 teaspoons salt
2 teaspoons instant yeast
6 tablespoons olive oil
2 cups water, at room temperature
½ cup Herb Oil
Extra olive oil for the pan

For the Herb Oil:
2 cups olive oil
1 cup chopped fresh herbs (any combination of basil, parsley, oregano, tarragon, rosemary, thyme, cilantro, savory, and sage) - OR - 1/3 cup dried herbs or a blend such as herbes de Provence
1 tablespoon coarse (kosher) salt
1 teaspoon ground black pepper
1 tablespoon granulated garlic or 5 to 6 fresh cloves, minced

1. To Make the Herb Oil: Warm 2 cups of olive oil to about 100 degrees F. Add 1 cup of chopped fresh herbs or 1/3 cup dried herbs. Add the salt, pepper, and garlic. Stir together and allow to steep while you prepare the dough. You can keep any leftover herb oil in the refrigerator for up to 2 weeks (it makes a fabulous dipping oil!).

2. Stir together the flour, salt, and yeast in a large mixing bowl. Add the oil and water and mix on low speed with the paddle attachment until all the ingredients form a wet, sticky ball. Switch to the dough hook and mix on medium speed for 5 to 7 minutes, or as long as it takes to create a smooth, sticky dough. The dough should clear the sides of the bowl but stick to the bottom of the bowl. You may need to add additional flour to firm up the dough enough to clear the sides of the bowl, but the dough should still be quite soft and sticky.

3. Sprinkle enough flour on the counter to make a bed about 6 inches square. Using a scraper or spatula dippedi n water, transfer the sticky dough to the bed of flour and dust liberally with flour, patting the dough into a rectangle. Wait 5 minutes for the dough to relax.

4. Coat your hands with flour and stretch the dough from each end to twice its size. Fold it, letter style, over itself to return it to a rectangular shape. Mist the top of the dough with spray oil, again dust with flour, and loosely cover with plastic wrap.

5. Let rest for 30 minutes. Stretch and fold the dough again; mist with spray oil, dust with flour, and cover. After 30 minutes, repeat this one more time.

6. Allow the covered dough to ferment on the counter for 1 hour. It should swell but not necessarily double in size.

7. Line a 17 by 12-inch sheet pan with baking parchment and drizzle ¼ olive oil over the paper, and spread it with your hands or a brush to cover the surface. Lightly oil your hands and, using a plastic or metal pastry scraper, lift the dough off the counter and transfer it to the sheet pan, maintaining the rectangular shape as much as possible.

8. Spoon half of the herb oil over the dough. Use your fingertips to dimple the dough and spread it to fill the pan simultaneously. Do not use the flat of your hands – only the fingertips – to avoid tearing or ripping the dough. Try to keep the thickness as uniform as possible across the surface. Dimpling allows you to degas only part of the dough while preserving gas in the non-dimpled sections. If the dough becomes too springy, let it rest for about 15 minutes and then continue dimpling. Don’t worry if you are unable to fill the pan perfectly, especially the corners. As the dough relaxes and proofs, it will spread out naturally. Use more herb oil as needed to ensure that the entire surface is coated with oil.

9. Loosely cover the pan with plastic wrap. Refrigerate the dough overnight (or for up to 3 days).

10. Remove the pan from the refrigerator 3 hours before baking. Drizzle additional herb oil over the surface and dimple it in. This should allow you to fill the pan completely with the dough to a thickness of about ½-inch. Cover the pan with plastic and proof the dough at room temperature for 3 hours, or until the dough doubles in size, rising to a thickness of nearly 1 inch.

11. Preheat the oven to 500 degrees F.

12. Place the pan in the oven. Lower the oven setting to 450 degrees F and bake for 10 minutes. Rotate the pan 180 degrees and continue baking the focaccia for 5 to 10 minutes, or until it begins to turn a light golden brown. The internal temperature of the dough should register above 200 degrees F (measured in the center).

13. Remove the pan from the oven and immediately transfer the focaccia out of the pan onto a cooling rack.

14. Allow the focaccia to cool for at least 20 minutes before slicing or serving.

Makes one 12×17-inch loaf
Source: Brown Eyed Baker, originally from The Bread Baker's Apprentice

Friday, February 24, 2012

Strawberries and Champagne Cheesecake

Fancy Pants Cheesecake
Happy Birthday Betty Badass! Tomorrow is my momma's birthday and I wish I could be there to bake her a cake...but I'm not so I'll have to settle for a picture of a cake. A cheesecake to be exact. Okay, so this picture is actually from New Year's Eve but let's not nitpick. I have good intentions. :)

Here is the tragic tale of this beautiful cheesecake. I baked it for a New Year's Party. We ate the cheesecake. We loved the cheesecake. We forgot the cheesecake. We left the cheesecake on the counter all night long. And the cheesecake perished. What a senseless and untimely death for this fair cheesecake.

I share this cheesecake with you today because my dear momma watched me slave away over this cheesecake on New Year's Eve. As I left for my party that evening, her one request was that I bring her a leftover slice of cheesecake the next day. However, tragedy ensued and my poor momma never got a piece of that delectable cheesecake. Sorry momma! :(

I offer the recipe for this fine cheesecake as an amends for my careless cheesecake behavior on New Year's Eve. Please accept this peace offering (and make dad bake you one for your birthday!). Love you Momma K!

Strawberries and Champagne Cheesecake

Ingredients:
1 cup Champagne or other sparkling wine
2 cups chocolate graham cracker crumbs (about 14 whole crackers)
2 cups sugar, divided
1/2 cup butter, melted
1 cup sliced fresh strawberries
3 packages (8 ounces each) cream cheese, softened
1/2 cup sweetened condensed milk
2 tablespoons cornstarch
2 eggs, lightly beaten
2 egg yolks

Topping:
20 fresh strawberries, hulled
1/3 cup milk chocolate chips
1 teaspoon shortening, divided
1/3 cup white baking chips
1 cup heavy whipping cream
1/4 cup confectioners' sugar

Directions:
Place Champagne in a small saucepan. Bring to a boil; cook until liquid is reduced to about 1/4 cup, about 8 minutes. Set aside to cool.

In a small bowl, combine the cracker crumbs, 1/2 cup sugar and butter. Press onto the bottom and 1-1/2 in. up the sides of a greased 9-in. springform pan; set aside. Arrange sliced strawberries over the bottom.

In a large bowl, beat cream cheese and remaining sugar until smooth. Beat in the sweetened condensed milk, cornstarch and reduced Champagne. Add eggs and egg yolks; beat on low speed just until combined. Pour over strawberries. Place pan on a baking sheet.

Bake at 325° for 55-60 minutes or until center is almost set. Cool on a wire rack for 10 minutes. Carefully run a knife around edge of pan to loosen; cool 1 hour longer. Refrigerate overnight.

Remove sides of springform pan. For topping, wash strawberries and gently pat with paper towels until completely dry. Slice and arrange over cheesecake. In a microwave, melt chocolate chips and 1/2 teaspoon shortening; stir until smooth. Drizzle over strawberries. Repeat melting and drizzling with white baking chips and remaining shortening.

In a small bowl, beat cream until it begins to thicken. Add confectioners' sugar; beat until soft peaks form. Serve cheesecake with whipped cream.

Serves 12

Source: Taste of Home (November 2011)

Thursday, February 23, 2012

Chambray Day!

J. Crew Perfect Shirt in Faded Chambray $43.75
There are trends that I love and embrace right away. For example, riding boots, furry vests, cupcakes. These are things that I can get behind. Automatically. Without question. Then there are the trends that take a little more time. Trends I need to mull over for a bit before I declare my undying love. Scarves as accessories (believe it or not), skinny pants (I still go back and forth depending on the day), and, most recently, chambray shirts.

When I first saw chambray popping up in my favorite stores, my initial reaction was something like this: "Chambray? What the what? Was there a sale at Orscheln's? Is my father now dictating fashion trends?" Cut to me a mere few months later scouring the Interwebs for the perfect chambray shirt. Don't judge. I'm a woman. It's my prerogative to change my mind.

The J.Crew version above is the one I finally settled on. Light enough to wear with dark wash denim. Long enough to tuck in. Close cut for easy layering. Chambray perfection! Part of my initial hesitation with chambray was the tricky business of how to wear it. Silly me! Chambray shirts are one of those versatile pieces that you can dress down or dress up. Let me take you on a quick tour of chambray versatility!

Source: Prepfection
Check out that mad layering action! I definitely plan to layer my chambray shirt under a blazer or over a tank or both. Love the red jeans with the chambray, too!
Source: Atlantic Pacific
Chambray, like denim, can go with anything from khaki to fuschia. Love this look with the bright pants! Are you seeing a theme, yet?

Source: Polyvore
Chambray is often layered UNDER sweaters, blazers, and jackets. I like it here layered OVER a simple white tee for a look that would work into spring. Simple and classic.

Source: Southern Pi Phi
This look is similar to the last in that the chambray is paired with black pants but I love that they've accessorized with leopard and camel leather. A great weekend look!
Source: Polyvore

This look is definitely more springy, pairing the chambray with white jeans and neutrals. This is definitely a year-round piece!
Source: Ann Taylor Loft
I hadn't considered pairing a button down chambray top with shorts but I love this look with the sleeves rolled up layered under a light cardigan. Perfect for a spring weekend outside.

Source: Fashion Salade
I am absolutely obsessed with this skirt. This look is so laid-back but still put together. I'm officially on the hunt for this southwestern-style skirt.

Source: Have Less Be More
I would definitely wear this look to work! Luckily, I actually ordered a bright red skirt from J.Crew along with my chambray shirt so this outfit will be happening ASAP!

Source: Pinterest
Source: Sparkling Glitter
I've grouped these two images together because I love how they both mix chambray with very dressy, very girly items like a sequin tank or a blinged-out necklace. The juxtaposition is great and goes to show just how versatile this piece is.

Source: Urban Chic for Cheap
Last but not least, if you haven't been convinced about the versatility of chambray, here's seven more options ranging from work appropriate to super casual. Whew! After all this chambray talk, I'm beginning to think I should have ordered two!

Now, do you love chambray yet???


Wednesday, February 22, 2012

Mustard Roasted New Potatoes

Meat n' Potatoes
I tend to be a fairly adventurous cook. I love trying new recipes, breaking out of my comfort zone, and experimenting with new types of food...much to my father's chagrin. My father is your typical midwestern guy. He loves steak, pot roast, fried chicken, and he is famous for his BBQ. In fact, if you look up "meat and potatoes guy" in the dictionary, I believe you'll find a picture of dear ol' dad. Herein lies the problem.

On my trips home, my offers to cook dinner usually go something like this:

Me: I thought I might make dinner tonight. Is that okay?
Dad: (concerned look) That depends on what you're making...
Me: I just saw a great recipe for (insert meal option outside of dad's comfort zone).
Dad: (mentally kicking himself for not teaching me better as a child) Why don't you ever make pot roast?

So that's pretty much how it goes. I end up making whatever I want and dear ol' dad patiently chokes it down. Personally, I think I deserve a big "thank you" for opening his world to the likes of pad thai, curry, vegetarian food, and so much more. But alas, the typical reaction is one of silent martyrdom. Ah well, you can't win 'em all.

And don't you go feeling sorry for dear ol' dad. I make plenty o' baked goodies to make up for a lifetime of experimental dinners. Fair trade.

I tell you of this dinnertime struggle to preface the meal above. Now THIS is a meal my father would be proud of. Pork chops and potatoes. Now that's man food at its best. The pork chops were okay, but these potatoes? Well, I could eat them at every meal...and I probably would if swimsuit season wasn't approaching at lightning speed. I made a half batch, but I fully recommend making the whole enchilada. You can thank me later. :)

Make them. Love them. Feed them to the "meat and potatoes" people in your life. :)

Mustard Roasted New Potatoes

Ingredients:
3 pounds new potatoes
1/2 cup whole grain dijon mustard
3 tablespoons olive oil
2 tablespoons unsalted butter, melted
2 cloves garlic, minced
3 tablespoon fresh lemon juice
1 teaspoon lemon zest
1 teaspoon kosher salt
ground black pepper to taste
1/2 medium yellow onion, sliced
chopped fresh parsley to taste

Directions:
Place a rack in the center of the oven and preheat to 425 degrees F. Line two baking sheets with foil or parchment paper, and spray with non-stick cooking spray. Set baking sheets aside.

Clean and dice new potatoes. Try to slice them so they’re just about all the same size. Place in a large bowl. Toss in sliced onions.

In a small bowl, whisk together mustard, olive oil, melted butter, minced garlic, lemon juice, zest, and salt. Pour mustard mixture over diced potatoes and onions. Toss until potatoes are coated. Divide the coated potatoes between the two baking sheets. Leave any extra mustard mixture in the bowl. It will just burn in the oven.

Bake potatoes for 20 minutes. Remove from the oven and toss. Return to the oven and bake for another 25 minutes, or until the potatoes are browned and cooked through. Remove from the oven, toss with parsley, and serve warm.

Serves 4-6

Source: Joy the Baker, originally from Epicurious

Tuesday, February 21, 2012

Study Project Update

"Before"
As I mentioned in one of my very first posts, I am in the process of decorating my study. It's been a slow process, but I'm happy to say that it is finally coming together! Although there are still a couple projects left to finish, I wanted to update you on my progress.

First things first, the lamp makeover I posted about last Friday. Thanks Shannon for the great advice! I ended up painting the lamp a gorgeous kelly green and I am sooo happy with how it turned out! The "before" picture above and the "after" is below.

"After"
I also decided to repaint an old bulletin board while I was at it. The color in the pictures looks a little lime-y, but it's really more of a true kelly green. I love the pops of color these two accessories bring to the room!

Bulletin Board Makeover
Work Station
Secondly, I'm proud to announce that I FINALLY made the trip up to Ikea to buy the Expedit bookshelf I've been coveting for months now. Yes, months. Check out the picture below. I have to say that I was pleasantly surprised by the quality of this bookshelf. For $129, this is one sturdy bookcase. It's almost as tall as me, weighs more than me, and looks great. Well done, Ikea!

Expedit Bookshelf
I have to send a big thanks to my bookshelf building buddy. I had originally thought I might be able to tackle this project myself, but that sucker was too much for this gal. Although I take full credit for all bookshelf decoration. Only someone as anally retentive as myself, would take the time to color coordinate their books. (sigh)

Color-Coded Bookshelf
Voila! A little bit closer to a finished study. My new chaise lounge is being delivered this Friday so by next week I should have a finished product to share! Woot woot! Then, I can share my next big project with you: the reupholstery project of 2012. Yikes!

Monday, February 20, 2012

Citrus Extravaganza!

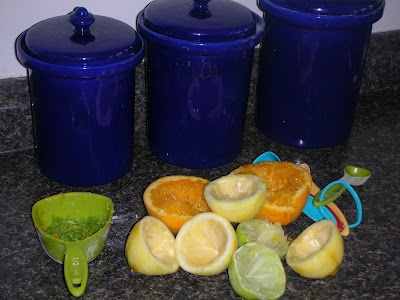
Citrus Carnage
A shocking amount of citrus was harmed in the making of this post. The above photo is only a portion of the citrus carnage. But it was sooo worth it.

I've been on a major citrus kick lately, now that it is back in season. Prices are crazy low so I've been stocking up and putting it to good use. I'm basically a zesting, juicing, citrus-loving machine. Which brings me to my first citrus recipe of the season...Citrus Lover's Bundt Cake! A delicious Bundt cake full of orange, lemon, and lime juice and zest and topped with a citrus glaze.

Citrus Lover's Bundt Cake
I shared this cake with a few friends from school and I've already been interrogated for the recipe so here it is, folks!

In the mood for citrus but don't want to make an entire Bundt cake? I recommend baking a batch of Crunchy-Topped Chocolate Chip Orange Muffins from How Sweet It Is. I baked some up last week and although mine were a tad bit fugly, they were beautiful on the inside. And by beautiful I mean delicious.

No excuses, people! Citrus is super cheap right now so whip up something citrus-y and refreshing and pray for spring with me. If you bake it, spring will come. :)

Citrus Lover’s Bundt Cake
Ingredients:
3 cups all purpose flour
1 tsp baking powder
1 tsp baking soda
1/2 tsp salt
3/4 cup butter, room temperature
1 1/2 cups sugar
3 large eggs
1 tsp vanilla extract
1 tbsp orange zest
1 tbsp lemon zest
1/2 cup freshly squeezed orange juice
1/4 cup freshly squeezed lemon juice
1/4 cup freshly squeezed limejuice

Glaze:
1 tbsp lemon juice, pref. freshly squeezed
1 tbsp orange juice, pref. freshly squeezed
2 tsp orange zest
2 tsp lime zest
1 cup confectioners sugar

Directions:
Preheat oven to 350F. Grease and flour a 10-inch bundt pan.

In a medium bowl, whisk together flour, baking powder, baking soda and salt. In a large bowl, cream together butter and sugar until fluffy. Beat in eggs, one at a time, followed by vanilla extract and zests. Stir 1/3 of the flour mixture into the butter mixture, followed by the orange juice. Add in additional 1/3 of the flour mixture, followed by the lemon and lime juices. Stir in all remaining flour, mixing only until no streaks of flour remain visible. Pour into prepared pan.

Bake for 40-45 minutes, until a toothpick inserted into the center of the cake comes out clean or with only a few moist crumbs attached.

Let cake rest in pan for 15 minutes, then turn out on to a wire rack to cool completely.

For the glaze, whisk together juices, zests and confectioners’ sugar in a small bowl until smooth. Add additional confectioners’ sugar if needed to thicken glaze if it becomes too thin. Drizzle over cooled cake.

Serves 12-14

Source: Baking Bites

Friday, February 17, 2012

New Lamp and New Paint


I've been doing a whole lot o' painting lately so I thought this quote was particularly appropriate this week! I am fairly convinced that a coat of paint can work miracles and solve most of the world's problems. OK, that may be a bit of an exaggeration but not by much. :)

Next week, I'll share some of my recent painting and DIY projects. However, in the mean time, I have a query for you all. Yesterday, I made a run to Target for a few essentials and somehow wound up in the lamp section. How did that happen???

I've recently been on a quest for lamps. I'm in desperate need of lighting for both my office and bedroom but cute lighting can get a bit pricey. Yesterday at Target was my lucky day, though! I found an adorable oval-shaped chrome lamp that would look perfect in my office and at $20 it was definitely in my price range.

But then, I saw the exact same lamp in black MARKED DOWN TO $5.98!!! Chrome lamp was subsequently forgotten and black lamp is now mine. A black lamp may not match my office decorating plans but, like I said before, a coat of paint can solve all problems.

Gotta love those orange clearance stickers at Target!

I had originally envisioned this lamp in silver but now I'm debating whether a pretty royal blue might be more fun. So, what do you think? Silver lamp? Blue lamp? Something else I haven't even thought of yet? I'd love to hear your opinion.

Leave some feedback and I'll present the finished product next week. In the meantime, have a wonderful and safe weekend! Go paint something!

Thursday, February 16, 2012

Envirosax

Optimistic Pouch Set $39.95
After gushing over jewelry for the past two weeks, I felt that I should show you that I do have a (slightly) more practical side. These are Envirosax reusable shopping bags and I can't' say enough good things about them. I received my set (the Optimistic set above) for Christmas from my Aunt Sue. I had been debating getting a set for a while; however, I could never decide which set I liked best. (First world problems, right?) So I left it in Aunt Sue's hands and I could not be happier with her choice...so cute!

These bags are surprisingly roomy. The website notes that each bag can hold the equivalent of two plastic shopping bags but I'd say that's a conservative estimate. Plus, the strap is long enough to fit over my shoulder, meaning less trips back and forth to the car. As an added bonus, I get compliments on my Envirosax bags every time I go grocery shopping. It always makes my day. :)

Anyway, I know these bags are a bit of an investment, but they will last you for years. The website has tons of different options but, as usual, I've done the leg work to hand-pick some of my personal favorite Envirosax products to share with you.
Cherry Lane Pouch Set $39.95
This was my other favorite set, aside from the Optimistic set. The red and white houndstooth bag is so adorable! To see close-ups of all five designs, just click on the link above.
Travel Pouch Set $24.95
Envirosax also carries a few smaller sets that include three (rather than five) reusable bags. I absolutely adore this Travel set. The three bags inside showcase popular travel destinations: New York City, Sydney, and Paris. Love these!

Hemp Bag $29.95
While most of their bags are made from waterproof polyester, Envirosax also offers a number of organic options. These bags are made from a variety of materials from hemp and linen to bamboo and organic cotton. These bags are a bit pricier, but will undoubtedly last you for ages. I particularly love the pattern and colors on the hemp bag above.

Linen Bag $29.95
Last but not least, I love the pattern on this linen bag. There are a couple other linen options featuring birds but I have to say that this one is adorable.

If you need an excuse to buy yourself a set, remember that Earth Day is coming up in April. If you need more of an excuse than that, pick up a copy of Collin Beaven's No Impact Man, it will make you never want to use a plastic bag. Ever. And if all that doesn't convince you? Look how cute they are! Duh. :)

Wednesday, February 15, 2012

Cinnamon-Swirl Pumpkin Rolls

Cinnamon-Swirl Pumpkin Rolls
Are you pumpkin-ed out yet? After an entire season devoted to pumpkin-flavored everything, I thought I had hit my limit. Pumpkin bread, pumpkin muffins, pumpkin pie, pumpkin tart, pumpkin spice latte, pumpkin body wash...you get the picture. Every autumn I overdose on pumpkin and then I abhor the sight of it for months.

Nevertheless, I was perusing some of my favorite food blogs recently and stumbled upon these. Pumpkin? Plus cinnamon rolls? Okay, I'm in. You should be too.

These aren't super pumpkin-y. They actually taste like a normal cinnamon roll with extra awesome mixed in. So, I guess what I'm saying is...you should make these before it becomes spring and eating pumpkin things becomes unacceptable once again. Hurry!

Cinnamon-Swirl Pumpkin Rolls
Ingredients:
1 cup canned pumpkin
2 large eggs
2 Tbsp to 1/4 cup lukewarm water (see note)
1/4 cup soft butter
4 cups all-purpose flour
1/4 cup whole wheat flour
1/4 cup nonfat dry milk
1 tsp. ground cinnamon
1/2 tsp. ground ginger
1/4 tsp. ground cloves, optional
3 Tbsp. brown sugar
1 1/2 tsp. salt
2 tsp. instant yeast

Filling:
3/4 cup sugar
1 Tbsp. cinnamon

Glaze:
1 cup powdered sugar
1 Tbsp. butter
1 1/2 Tbsp. milk

Directions:
Mix and knead all of the dough ingredients together by hand or in a stand mixer until you've made a soft, fairly smooth dough. Let the dough hook knead it for about 5 minutes.

Cover the bowl and allow the dough to rise for 1 1/2-2 hours, until it's almost doubled. Turn the dough out onto a lightly greased surface. Roll it into a 14"x22" rectangle; the dough will be thin - about 1/8th of an inch. Mix the filling ingredients and spread a thin layer over the dough, leaving one short edge free of filling.

Starting with the short end that's covered with filling, roll the dough into a log. Cut the log into nine 1 1/2" thick rolls. Place the rolls into a lightly greased 9"x9" pan that's at least 2" deep. Set aside in a warm place, covered, to rise for 1 hour, or unit the rolls look puffy.

Bake the rolls in a preheated 375°F oven for 25 to 30 minutes, until they're lightly browned and feel set. Remove them from the oven, and set them on a rack. Allow them to cool for about 15 minutes. Towards the end of the cooling time, make the glaze.


To make the glaze: Heat the butter and milk together till the butter melts. Whisk into the sugar.

 Drizzle the warmrolls with the warm glaze. Sprinkle with chopped nuts, if desired.

Yield: 9 rolls

Source: from Perry's Plate, originally from Baker's Banter, the King Arthur Flour Blog

Tuesday, February 14, 2012

Happy Valentine's Day!


Happy Valentine's Day! Pop quiz: name the show that quote up there came from. Bonus points if you can recall the exact episode. I've begun deconstructing my Craig's List chair, which is a slooow process. On a related note, I have had ample time to re-watch my all-time favorite television show (the source of the quote above). However, that's neither here nor there and it's V-Day so I guess I should talk about love, right?

(crickets chirping)

(paint drying)

(glaciers melting)

So yeah, apparently I'm not much of an expert on love. Besides, I'm fairly certain that subject has been pretty much covered by the likes of Jesus, Shakespeare, and every trashy romance novelist ever. Nevertheless, after a decade of misadventures in dating, I've learned a thing or two about a thing or two. So, for your reading pleasure, and so that other's may avoid my mistakes, I've compiled a handy list of Valentine DO's and DON'T's.

DON'T go overboard. Sure there's a time and a place for some lovey-dovey stuff, but there is NOTHING worse than forced romance. Guy who took me to a golf course so that we could slow dance on the green in the moonlight while you sang Frank Sinatra to me...on our first date? I'm looking at you. And, I really am sorry for laughing and ruining the romantic moment you were trying to create. Just...no. Yikes. Don't be that guy...or girl.

DON'T be a hater. What's the Valentine's version of Ebenezer Scrooge? The Devil, maybe? Don't be that person. What, you don't "believe" in Valentine's Day because it's a commercialized holiday invented by Hallmark and the chocolate/diamond/lingerie industry? Whatever. If you are going to take moral issue with a holiday, try Thanksgiving. Call me crazy but stealing America from the Native Americans is way worse than buying in to a commercialized holiday. Hello, have you heard of Christmas? Baby Jesus has been exploited just as much as Cupid. Just buck up and make Valentine's Day happen for your significant other.

DO the unexpected. A dozen red roses? A heart-shaped necklace? Overpriced dinner and drinks at a fancy restaurant? You're doing it wrong, my friend. Valentine's Day is about showing your love and appreciation for that special person in your life. That doesn't mean you have to play into all the V-Day cliches. Be unique, be personal, be creative. One of my most memorable Valentine's Day involved a home-cooked meal, a couple bottles of wine, and an intense night of Scrabble. Know why that guy dominated the holiday? Because he knew what I liked and made the night perfect for me. Simple as that.

DO enjoy this holiday! It doesn't matter if you're single or coupled. Pull out your pink and red clothes, give yourself a Valentine manicure, buy yourself something special. Valentine's Day doesn't have to be stressful and cliche. Think of it as a day to treat yourself and your loved ones extra special. What's not to like about that?

Hope these pearls of dating wisdom help. I'll be back tomorrow with a delicious recipe for all you love birds. Have a great Valentine's Day!

Monday, February 13, 2012

Shadow Box Makeovers

The "Before" Picture
Ever since I moved into my apartment last August, I've been slowly but surely decorating and redecorating to make it my "dream" apartment. It's been a sloooow process, particularly so considering my busy schedule and less-than-ideal decorating budget. I've had to get a little creative and bust out my DIY on this beeyatch. Not that I'm complaining...seeing it all come together is so fun!

One of my latest projects has been decorating my study and I thought the shadow boxes above were just asking for a makeover. I had picked up these shadow boxes on sale at Michael's last November and with a few cheap ornaments, bows, and scrapbook paper, they made for some cute and easy holiday decorations. However, the time had come for them to fulfill their true decorating destiny.

Travel Mementos
Recently, I was cleaning out my study closet and found a whole box of vacation mementos. The hoarder part of my psyche (that I clearly inherited from my dear ol' dad) wouldn't let me throw this stuff away...but it seemed like a waste to let it collect dust in a box. Time for a craft day!

NYC Shadow Box
One quick trip to Michael's for some scrapbook paper, alphabet stickers, and silver paint and I was ready to go! After sifting through masses of ticket stubs, maps, and other odds and ends, I decided to divvy up the shadow boxes to New York, Napa Valley/San Francisco, and Chicago.

Napa Valley/San Francisco Shadow Box
It took a bit of arranging and rearranging and rearranging again but, despite that, these shadow boxes came together quite quickly. Once I had glued down all my mementos, I brushed the frames with a few coats of silver paint and...voila!

Chicago Shadow Box
 These beauties are destined for my study...once I get some actual furniture in there! I can't wait for everything to start coming together. My chaise is set to arrive February 24th and I'm determined that I'll make it up to IKEA for my bookshelf by next weekend! (Hopefully.)

Vacation Shadow Boxes
I hope you like the finished product. I'm so happy with them! Next project...reupholstering a chair for my living room. I'll post pictures as soon as I can. In the mean time, I think I might need to look into getting a tetanus shot. Happy Monday!

Friday, February 10, 2012

Friday Thoughts


Good advice, no? I'm going to keep this in mind this weekend. For the past few weeks, I've really been trying to utilize more of my wardrobe. I have to give credit to Pinterest, though. I've turned all my hangers backwards and they can only be turned right once I've worn each piece of clothing. After six months, any item still on a backwards hanger gets donated.

So far, it's been a good reality check. I already have a bag full of clothes to donate that I just couldn't force myself to part with before. And, I've rediscovered a bunch of pieces I had completely forgotten about! I'm looking forward to having tons more room in my closet at the end of the six months. Plus, it'll be the perfect excuse to go shopping!

This weekend, I'm going out for girl's night in Providence and you better believe I'm gonna dress for a party! Fingers crossed that I'll finally make it up to the Ikea in Boston this Saturday to get the bookcase I've been eyeing. I'll keep you posted! Have a great weekend and remember to dress like you're going somewhere fabulous! :)

Thursday, February 9, 2012

Dogeared Jewelry

make a wish necklace with gold dipped honeybee on yellow $30
Welcome to week two of My Favorite Things! Last week I pined over chunky, gold watches. This week I am going to tell you about something I have and love...Dogeared jewelry. This Internet retailer sells necklaces, bracelets, earrings, and other accessories that are super adorable and affordable.

The necklace above is the one I own, a gold honeybee charm on a gold silk thread. The idea is to make a wish when you receive the necklace and, when it finally breaks, the wish will come true. It's a bit cheesy but they make for great gifts and they're much more durable than you would expect. I've had mine for almost a year and it's still going strong! They offer a ton of different charms both in gold and silver and most come on your choice of a colored silk thread or (if you want something more permanent) a gold or silver chain.

I was recently perusing the site and noticed that they've expanded their line with a ton of new styles so I thought I'd share with you. After all, Valentine's Day is coming up quickly, so drop some heavy hints to your favorite man friend and maybe you'll get something sparkly! :)

The necklace below is from the new Karma line. Most of the new designs in this line feature circles (to represent the whole "what goes around, comes around" ideology). However, I was drawn to this faceted bead design because of its rose gold finish and dainty looks. Love it!

karma faceted bead rose gold dipped necklace $66
The next necklace is from another new line, the Love Collection. This necklace would be the PERFECT Valentine's Day gift. It's so much more unique than the ubiquitous heart necklace and it just makes me smile! It's offered in silver and gold.

xo sterling silver necklace $74
This next necklace is also from the Love Collection and it would also work as a great Valentine's option, but I think it could also serve as a great gift to a close friend, sister, or mom. This charm is offered as a necklace or bracelet in silver or gold.

small gold dipped infinite love necklace $56
While most of Dogeared's designs are necklaces, they also offer a lot of great necklaces, earrings, and pins. The bracelet below is called the Circle Bracelet and I love the simplicity of it. The charm is also available as a necklace but I think the red Irish linen is really fun.

circle bracelet gold dipped on red irish linen $38
This is just a few of the dozens of adorable options at Dogeared. I could spend so much money there! Check them out. I hope you love them as much as I do!