Thursday, May 31, 2012

blueberry-poppy seed loaves


My baking streak continues this week with Blueberry-Poppy Seed Loaves. No, it's not a tart. A girl can only make so many tarts before she turns into a tart. So, instead, bread.

Random thought of the day: Why is it that a loaf of bread sounds just dandy...but a loaf of anything else sounds absolutely vile? Meatloaf? Gross. Ham loaf? Gag. Even just the word "loaf" alone makes me a tad bit queasy. Anyone else with me on this one? Or is this just a weird Katy thang?

Anyway, I made you some loaves today. Nope, sorry. Can't do it. I've gone and freaked myself out with the whole "loaf" thing. Correction: I made you some bread today. That's better. It's light and fluffy and filled with fresh blueberries and poppy seeds. It's summery and sweet and perfect for breakfast. Now stop "loafing" around and go make some bread! Haha! Yes, I am a cheese ball.

Blueberry-Poppy Seed Loaves Bread

Ingredients:
3 cups all-purpose flour
1 1/2 tsp. baking powder
2 1/2 cups sugar
pinch of salt
1 1/2 cups milk
1 1/3 cups vegetable oil
3 large eggs
1 1/2 Tbsp. poppy seeds
1 1/2 tsp. almond extract
1 1/2 tsp. vanilla extract
1 cup blueberries

Directions:
Preheat the oven to 350. Spray three small loaf pans (4x6") with non-stick spray.

Whisk the flour, baking powder, sugar and salt in a large bowl. Beat the milk, vegetable oil, eggs, poppy seeds, and almond and vanilla extracts in a stand mixer fitted with the paddle attachment on medium speed until combined. Gradually beat in the flour mixture until well combined. Fold the blueberries into the batter with a spatula.

Divide the batter among the prepared pans and bake until golden on top and a toothpick inserted into the center comes out clean, roughly 1 hour, 10 minutes. Transfer the pans to a rack and let cool completely.

Yield: 3 small loaves
Source: Food Network Magazine May 2012

Wednesday, May 30, 2012

garden tomato and basil tart


I've been feeling a bit tarty this week. No, not in that way. I've been perfectly prudish all week. (sigh) However, I have been busting out the ol' tart pan like nobody's business. Yep, that's right. This week I bring you not one, but TWO tart recipes! That must be some kinda record...beating my previous record of zero tart recipes in one week. Wowza, look at me go. Personal best.


I decided to mix things up a bit this time and bring you a savory tart. Say what?!? A tart that's not dessert? Yep, that's right. A tart that is DINNER, people! It all starts with the dough. Part whole wheat (so it's healthy) and seasoned with dried basil and sea salt. I could eat that whole crust alone. But then I added heirloom tomatoes, fresh basil leaves, and some Swiss cheese to bind it all together. This tart tastes like pure summer time.


Make this tart and enjoy it al fresco this summer. Then, you should have some Strawberry Peanut Butter Tart for dessert. Tart it up people! It's summertime!

Garden Tomato and Basil Tart

Olive Oil Tart Crust:
1 cup whole wheat flour
1 cup all-purpose flour
1 teaspoon fine sea salt
1 teaspoon dried basil
1/3 cup olive oil
1/3 cup cold water, plus extra if necessary

Preheat oven to 350 degrees (175 degrees C).

In a medium bowl, whisk together the flours, salt, and basil. Add the olive oil and water and mix until it comes together as a dough. If dough will not form a ball, add more water in teaspoon increments until it does so. The dough should not be sticky and wet.

On a lightly floured surface, roll out dough to form a 12 inch circle. Transfer to tart pan, repairing dough if necessary. Prick the bottom of the dough with a fork before baking. Bake for 10-12 minutes before removing and allow to cool slightly before filling.

Tomato Basil Filling: 
1-1 1/2 cups freshly grated Swiss cheese, loosely packed
1/2 cup fresh basil leaves
3-4 large heirloom tomatoes, cut into 1/4-inch slices (cherry tomatoes may also be used)
Freshly ground salt & pepper, to taste

Layer cheese, tomatoes, and basil on pre-baked tart crust. Sprinkle with salt and pepper, to taste. Bake for 25-30 minutes, or until fragrant and lightly browned. Cool for a few minutes before serving.

Yield: one 10-inch tart
Source: The Pastry Affair

Tuesday, May 29, 2012

skirts to the max

Source: Atlantic-Pacific
It's official. It's summertime. Memorial Day has come and gone. Kids are annoying their parents instead of their teachers for the next three months. And the summer heat wave has hit Rhode Island. And by heat, I mean that the high finally broke 80 degrees. Yeesh!

Side note: When did my conception of heat change so drastically? Last summer in Kansas, I would have piled on a turtleneck and parka if the mercury fell below 90. Now I'm cursing the sun if the temp rises above 75. I suppose it may be due, in part, to the fact that my apartment does NOT have air conditioning. Yikes.

Anyway, now that the temperature is rising, I am suddenly averse to the idea of clothing. When it's hot and sticky outside, I just wanna walk around nekkid! Who's with me?!? However, not wanting to blind people or scare small children, my Plan B is typically a maxi dress. They're flowy, breezy, and they don't cling to my sweaty bod like real clothes do. Face it, who wants to shimmy into jeans when it's 500 degrees outside?

However, recently I have spied with my little eye maxi SKIRTS. Whaaa?!? Oh yes, and dare I say, I might love them more? Please just don't tell my maxi dresses I'm going to cheat on them with skirts. I've collected a couple here that I've been crushing on. I love, love, love the big print on the one above (especially paired with a chambray shirt, but you already knew I was going to gush about that, didn't you?).

Source: Fashion Worship
I love the bright, solid color of this skirt. That bright coral shade is perfect for summer...especially paired with that great striped tote. Perfect for a weekend brunch or maybe some shopping.

Source: A Cup of Jo
This look is definitely more subdued than the rest but I kind of love the dark slate color of this one. The dark color would easily allow this maxi skirt to work for a date night out. Plus, I love the idea of belting a maxi skirt at the waist to add some definition and shape.

Source: Polyvore
Another fun day outfit. The navy blue and sea foam green paired with all the gold and natural accessories is so nautical and classy. Love.

Source: Rose a la Mode
Last but not least, of course a white maxi skirt is a must for the summer! The color lightens it up and goes with anything and everything in your closet. Love it paired with that slouchy grey tank. Perfection.

So I'm off to go hunt for a maxi skirt or two to add to my summer rotation. I can imagine these skirts going from beach cover-up to shopping with the girls to hot date night on the town. In fact, I better stock up on these suckers...it's gonna be a looong summer!

Monday, May 28, 2012

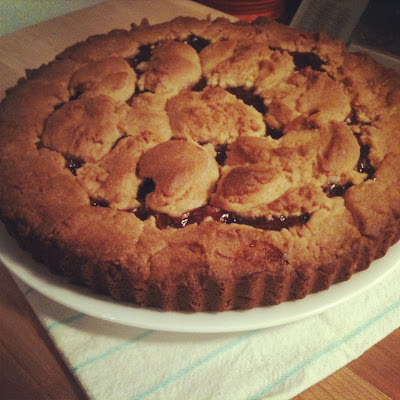
strawberry peanut butter tart


When the going gets tough, the tough get...in the kitchen and cook like there's no tomorrow. What is it about the kitchen that is so cathartic? Nothing is as calming as kneading the living daylights out of some cinnamon roll dough or braising a pot of short ribs. Perhaps it's the idea of throwing all your frustrations into something tangible for a bit and having something to show for it when it's all said and done.

With that said...expect some serious dishes from me in the next week or so. It's time for me to knead out my frustrations. Yup, it happens every once in a while. Hey, at least I'm not taking my frustrations out with a bottle o' bourbon, high-stakes gambling, or expensive hookers. Wait...what? Anyway, cooking is a relatively harmless stress reliever. Plus, the upshot here is that I'll have lots of goodies to share with you lovely folks.

Anywho, that's all neither here nor there. What is here is a tart...because sometimes it's just fun to make something pretty. And tarts are always pretty. Sure, you could probably make this in a pie pan or standard 9x9" pan, but why would you do such a thing when you can make a tart? Now go tart it up folks. I'll be back soon with some serious, good for the soul food!


Strawberry Peanut Butter Tart

Ingredients:
12 Tbsp unsalted butter, softened
2 1/4 cups all-purpose flour
1/2 tsp. baking powder
1/4 tsp. salt
1 cup peanut butter
1/2 cup granulated sugar
3/4 cup confectioners' sugar
1 egg
1 tsp. vanilla extract
1/2 cup strawberry jam

Directions:
Preheat the over to 350. Generously butter a 9-inch fluted tart pan with a removable bottom.

Whisk the flour, baking powder and salt in a medium bowl. Beat the butter, peanut butter and both sugars in a separate bowl with a mixer until smooth. Beat in the egg and vanilla. Add the flour mixture and stir with a wooden spoon until combined.

Press half of the dough into the prepared tart pan. Spread the jam over the dough, leaving a 1/2-inch border around the edge. Drop about half of the remaining dough over the jam by the tablespoonful; lightly press the rest of the dough into the pan around the edge to form a crust. Bake until golden, 45 to 50 minutes.

Transfer the pan to a rack and let cool. Remove the ring and transfer the tart to a plate.

Serves 10 to 12
Source: Food Network Magazine September 2011

Friday, May 25, 2012

lazy days


Happy Friday people! This week I've fully embraced a summertime mindset. I've been doing all the things I normally don't have time for and actually appreciating my downtime. This may not sound like a big deal to many of you...but for me it's a revelation. As a gal who revels in schedules, free time has ever been my enemy. I'm changing that this summer though...one lazy day at a time.

So now that my Katy brain is devoid of all things writing and rhetoric, here are some things now filling my noggin and making me oh-so-happy:

1. Sorry mom, but I am obsessed with the Fifty Shades of Grey series. I know, I know. It's total smut. Complete trash. Whatevs. It's my summer read. Do it.

2. J. Crew is having a Memorial Day sale all weekend. This could be trouble for my checkbook. So I wanted to share the temptation with you. You're welcome. Go get 'em.

3. I finally, finally saw Midnight in Paris the other night. Sooo good! Oh goodness, so good. I geeked out slightly over the literature references...but even the average non-lit geek would also enjoy. Definitely recommend you all watch it this weekend!

4. Cucumber water! I've been chugging cucumber water like nobody's business lately. Half a cuke, sliced into a pitcher o' water. That's it! So easy and so refreshing. Cucumber water is going to be my official summer staple.

5. I've been lucky enough to eat some seriously amazing food lately. Boston is filled with restaurants that will knock your tube socks off. However, despite all this fantastic food, one dish in particular has remained prominently at the forefront of my brain. The Banana Stuffed French Toast from Zaftigs Deli. Oh. Em. Gee. I don't know how they make this stuff but I had to suppress the desire to slather it all over my body...right there in the restaurant. It's just that good. My mission is to recreate it...and this seems like a good place to start.

Okay, with that, I will leave you to your fun-filled Memorial Day weekends. Have fun, be safe, make some boozy drinks, and, most of all, relax!

Thursday, May 24, 2012

day dizzy drinks

carolina peach sangria
Memorial Day is coming up this weekend! In honor of the holiday weekend...as well as the proceeding three months of summa time, I thought I'd bring you some delicious adult beverages. You know, in case you were planning on getting a little day dizzy...or evening dizzy or night dizzy.

Nothing says summer like fruit and booze combined in a glass. It's like they have a long standing and recurring summer fling...and I'm totally okay with that. Last summer I declared to be Sangria Summer. And that was pretty fantastic. I can't even remember how many versions of sangria I made (and downed) during long days by the pool with friends. Although, I do have one word of warning: chopping fruit for sangria after already imbibing is a bad idea. Trust. Your poor little fingers will thank you!

This summer, I'm all about the sangria once again. However, Pinterest has recently opened my eyes to all the fruity cocktails I've been missing out on for so long. Mint juleps, mojitos, margaritas, daiquiris. I mean, we've all tried many of these drinks in their most basic form. But now, thanks to the power of Pinterest, I could potentially make a different version of a mojito for every single day of summer. And that doesn't sound like a bad idea to me! Ah, the wonder of technology. What would I do without it?

So, I've listed some of my top picks for summa time drinking here today. These drinks are at the top of my list for summer parties, BBQs, and days at the beach. You'll find links to each recipe in the picture captions. Click, mix, and booze!

pineapple sangria
blackberry mint julep
watermelon lemonade slushie
peach lemonade coolers
Okay, is your mouth watering yet? Let's all celebrate the fruit/booze summer time love affair. Enjoy!

Wednesday, May 23, 2012

pesto parmesan crusted tilapia

Dinner!
Confession time. I have this new obsession. It's called My Big Fat Gypsy American Wedding. Oh. My. Lordy. Have you seen this show yet? No? If not, you really must tune in immediately. There are no words to describe this show. It's a glorious disaster. It's...well, it's like watching Jersey Shore. You know you shouldn't. You know your brain cells are slowly dying (or committing suicide) as you watch. But you just can't look away.

14-year-old girls getting married? Check. Elaborate wedding dresses covered in Swarovski crystals weighing 75 pounds? Check. Courtships that last a month? Check. This show truly meets all the requirements of great reality TV. It requires zero brain activity and continually causes me to exclaim "WTF!?!" Please go watch it immediately...if for no other reason than to make me feel better about watching a marathon of episodes last night. Oy gevalt.

So anyway, now that's off my chest...did you make some pesto? If not, did you buy some pesto? I hope so because you're gonna need it! Your gonna slather that pesto all over some fish, coat it in some panko breadcrumbs and Parmesan and savor your homegrown (or home bought) goodness. Enjoy...and go watch some Big Fat Gypsy American Wedding!


Pesto Parmesan Crusted Tilapia

Ingredients:
1/2 cup panko bread crumbs
1/4 cup grated Parmesan cheese
salt and pepper
1 Tbsp lemon zest
8 Tbsp basil pesto, divided
4 tilapia fillets, each about 1 inch thick and 4 oz each (or other white fish)
cooking spray
fresh lemon juice, for serving

Directions:
Preheat the oven to 450 degrees and line a baking sheet with foil. Spray the foil with nonstick cooking spray.

Meanwhile, combine the panko, Parmesan, and salt and pepper to taste in a small bowl. Stir the lemon zest into the pesto.

Arrange the tilapia in a single layer on the baking sheet and pat dry with a paper towel. Season with salt and pepper, and spread 2 tablespoons of pesto over each piece of fish. Press the parmesan-panko mixture over the pesto. Spray with nonstick cooking spray.

Cook until the top is turning golden-brown and the fish flakes easily with a fork, about 10 to 12 minutes. Squeeze the lemon juice over the top and serve immediately.

Serves 4
Source: adapted from Pink Parsley

Tuesday, May 22, 2012

homemade pesto


Guess what folks? Not only did I NOT kill my little herb garden, my plants are THRIVING! Check out my basil above. I'm fairly certain that had I not cut it back yesterday, it might have broken through my ceiling into the third floor apartment. Yup, my thumb is officially green.

So I decided to finally put all this basil to good use. What's the best thing to make with basil? If you answered anything besides pesto, you'd be wrong. Except maybe if you said caprese salad. That is also an acceptable answer. But, mainly, pesto. Pesto is more right.

What I'm getting to here is that I made homemade pesto! I apologize that the picture below is rather unattractive. It's just really hard to make green sauce look appetizing. But, I promise you, this pesto is perfection. It's an Ida Garten recipe...so it's basically guaranteed to be fantastic. That Ina, she does not disappoint. Side note: I have this not-so-secret obsession with Ina Garten. Like, if I was 30 years older, I think we would be BFF's. Oh, who am I kidding? I'm basically a grandmother already. Ina and I are like soul mates.


Like most Ina Garten recipes, this one makes a ridiculous amount of food. I ended up making a half batch of this recipe and it still made plenty. In fact, I had more than enough and ended up divvying tablespoons of the leftover pesto into an ice cube tray and freezing it for future use. Sheesh, what an Ina-ish thing to do.

So here's the plan. Make this pesto...or buy pre-made pesto if your thumb is not super green like mine. Then, tomorrow, I'll be bringing you a delicious fish recipe that will utilize said pesto. Okay? Meet you here tomorrow...same time, same place. :)


Homemade Pesto

Ingredients:
1/4 cup walnuts
1/4 cup pine nuts
3 Tbsp chopped garlic (9 cloves)
5 cups fresh basil leaves, packed
1 tsp kosher salt
1 tsp freshly ground black pepper
1 1/2 cups olive oil
1 cup freshly grated Parmesan cheese

Directions:
Place the walnuts, pine nuts, and garlic in the bowl of a food processor fitted with a steel blade. Process for 30 seconds.

Add the basil leaves, salt, and pepper. With the processor running, slowly pour the olive oil into the bowl through the feed tube and process until the pesto is finely pureed. Add the Parmesan and puree for a minute.

Serve, or store the pesto in the refrigerator or freezer with a thin film of olive oil on top.

Yield: 4 cups
Source: Barefoot Contessa Back to Basics

Monday, May 21, 2012

coffee coffee cake muffins


You know those moving sidewalks they have in airports? I love those things. I mean, it's a MOVING SIDEWALK! What's not to love?!? I feel like there are two types of people in this world. Those who stand around on the moving sidewalk and those who really take advantage of them. I am of the latter type. When I'm on a moving sidewalk, I don't just stand there like a sloth. No sir. I power walk at super speed. I zoom by people at record breaking speed. I am a speed demon!

However, when I get to the end of a moving sidewalk? Yikes. Not so pretty. I take my first step off and I am immediately thrown off balance. It's like I'm learning to walk for the first time...every time. You'd think I'd get the hang of the dang things sooner or later, but, alas, it's my lot in life to be the idiot that falls off the moving sidewalk. Every. Single. Time.


These past two weeks of my life have been like one gigantic moving sidewalk. I have been zooming along at break neck speed. I finished my first year as a PhD student, I graded roughly 3,472 papers (give of take a few thousand), I hosted four house guests at various times, and, I basically just dominated life. Super Kate.

However, all of those things finally came to an end this past week and I came to the end of my metaphorical moving sidewalk. No more Super Kate. Just regular ol' Kate. And the sudden transition from super speed to complete standstill threw me off balance...just like those dang moving sidewalks do every time. My first official day of summer left me a bit melancholy...not sure what to do with all my newfound free time. After a weekend of relaxation, reading, and general laziness, I am finally regaining my balance and returning to the ol' blogging world in full force. Hey old friends, I've missed it here!

So my first order of business this past weekend was some serious baking. These muffins were the first batch I've made in a while and I've been enjoying them with big cups o' coffee as I laze about reading my dirty smut novel (50 Shades of Grey...anyone else reading/loving/obsessing over it?) And can I just tell you? It feels good to be off the ever-moving sidewalk for a change. :)

Coffee Coffee Cake Muffins

Ingredients:
10 Tablespoons unsalted butter
1/2 cup plus 2 tablespoons whole milk
2 large eggs
2 teaspoon vanilla extract or 1 vanilla bean
2 1/4 cups all-purpose flour
1 cup sugar
2 1/4 teaspoons baking powder
1 teaspoon salt
1 1/2 teaspoons istant espresso powder mixed with 1 1/2 tablespoons warm water

For the Topping:
3 Tablespoons cold, unsalted butter, cut into 1/2-inch cubes
1/2 cup all-purpose flour
3 1/2 tablespoons sugar
1/2 teaspoons ground cinnamon
Directions:
Put a rack in the upper third of the oven and preheat oven to 350 degrees F. Line muffin pan with paper or foil liners.

Melt butter in a small saucepan over medium heat. Keep an eye on the butter. Melt and cook down the butter until little brown bits appear in the pan. The crackling will subside and butter will begin to brown fairly quickly after that. Keep a close eye. Remove from heat.

If using vanilla bean, split the vanilla bean down the center, scrape the seeds out, and in a small bowl, rub the vanilla beans into the granulated sugar. I used my fingers and it worked like a charm. Set aside.

In a medium bowl, whisk together milk, eggs, and vanilla. Add the brown butter and stir to combine.

In a large bowl, whisk together flour, sugar, baking powder and salt in a medium bowl Add milk and butter mixture all at once, and stir gently to combine.

Divide half of the batter among muffin cups. Stir the espresso and water mixture into the remaining batter. Divide the espresso batter between the twelve muffin cups.

To make the topping combine all of the ingredients in a bowl and rub together with your fingertips until crumbly. Sprinkle evenly over the batter in the cups.

Bake until golden and crisp and a wooden pick inserted into the center of a muffin comes out clean, about 18-20 minutes. Keep an eye on them… they dry out quickly. Cool in pan on a rack for 15 minutes then remove from the pan. Serve warm or at room temperature.

Yield: 12 muffins
Source: Joy the Baker

Monday, May 14, 2012

chocolate toffee shortbread bars

One lonely bar.
Short post today. My little baby sister and her roommates are here in The Baby State! Also, I may or may not still have grading left to do...but let's not dwell on such things today. Today, I take my house guests to Newport! Grading can wait until another day. And that day will be tomorrow when final grades are due. Yikes.

Anyway, moving on...I made some Katybake! The technical term for this recipe is Chocolate Toffee Shortbread Bars, but I used to date a guy that referred to these suckers as Katybake. One word. Katybake. I don't know why but, hey, whatevs. These bars are now one of my go to recipes because they are so easy and so so yummy. Shortbread and chocolate and toffee, oh my!

Chocolate Toffee Shortbread Bars

Ingredients:
For the shortbread base:
1½ cups all-purpose flour
½ tsp. salt
¼ tsp. ground cinnamon
2 sticks (1 cup) unsalted butter, at room temperature
½ cup brown sugar, packed
¼ cup granulated sugar
1 tsp. vanilla extract
3 oz. bittersweet or semisweet chocolate, finely chopped

For the topping:
6 oz. bittersweet or semisweet chocolate, finely chopped
1½ cups toffee bits

Directions:
Preheat the oven to 375˚ F. Line a 9 x 13″ baking dish with foil and spray lightly with cooking spray. To make the shortbread, combine the flour, salt and cinnamon in a small bowl; stir to blend and set aside. In the bowl of an electric mixer, combine the butter and sugars and beat on medium-high speed until light and fluffy, about 3 minutes. Blend in the vanilla. With the mixer on low speed, beat in the dry ingredients just until incorporated. Stir in the chopped chocolate until evenly distributed.

Transfer the dough to the prepared baking dish and press into an even layer covering the bottom of the pan. Bake for 18-20 minutes, or until the shortbread is bubbling. Remove the pan from the oven and transfer to a wire rack.

Sprinkle the 6 ounces of chopped chocolate evenly over the top of the cookie base. Cover the pan with foil and let sit for 5 minutes. Remove the foil and use an offset spatula to spread the melted chocolate evenly over the crust in a thin layer. Immediately sprinkle the toffee bits over the melted chocolate and press down gently to adhere. Let the bars cool to room temperature. Once the pan has cooled, you may speed chilling by transferring to the refrigerator or freezer. When the topping is set, remove from the pan, transfer to a cutting board and slice into bars.

Yield: 30 bars
Source: Annie's Eats

Friday, May 11, 2012

kate's dates

Isn't this what everyone wants? Equal parts weird and sexy? Or maybe not. Maybe it's just me. Either way, this deadly combination is hard to find. Trust me...I've done the leg work. Speaking of which, I've decided it's high time for an update on my wild world o' dating in a little section I've just entitled: Kate's Dates. It's catchy, no? Subtitle: you're doing it wrong.

So today I have for you a list of nine ways to tell if you're doing it wrong. Dating, I mean. This list was accumulated over a considerable period of time and many awkward situations on the part of the blogger. All of these pointers are based in fact. Names have been omitted to protect the guilty parties. Please distribute this list to the men in your life. Or men who wish to be in your life. Knowledge is power.

Why nine? Because it seems like a good number. It's a perfect square. I do what I want.

First Dates: How to Tell if You are Doing it Wrong


1. If you at any point make a snotty comment about never getting married...you're doing it wrong. You're on a date, bud. Maybe you don't want to get married. Whatevs. But, sheesh, know your audience.

2. If you, at any point, think it is a good idea to lead with the fact that you are super-duper-rich, think again. Sure, you're going to attract some ladies with that tactic, but probably not the type you want. Unless you want a trophy wife with an empty head. Then definitely go for it.

3. If your last girlfriend was a stripper and/or you've ever dated anyone in the erotic entertainment industry...that's a little nugget you probably should not share until a later date. Do I even need to explain this one? Objectification of women...bladdy blah, standards of beauty and body image issues...blah blah blah, questionable past relationship choices...blah bladdy blah, sexually transmitted diseases...blah blah. I'll let you fill in the particulars. You get the idea, though.

4. If your first instinct is to text your date the next day to say you had a good time...good call. That's a great idea. However, if your first instinct is to repeatedly and increasingly harass your date into going out with you again the next day...think again bud. Side note: when said date refuses, it's generally not a great idea to tell her she is "difficult." Just saying.

5. If you get through dinner and drinks without asking your date anything about herself, you might want to seriously reevaluate things. Don't be surprised when she makes a quick exit and gives you no more than an awkward side hug. Here is a secret: people love to talk about themselves. That is a fact. Use it to your advantage. If you get a girl talking about herself, you're golden.

6. If your date is continually yawning and mentioning how tired she is...that's a hint. A bad idea would be to ask yourself up to her apartment. Just cut your losses and move on, guy.

7. If you try to take your date to a Chinese buffet restaurant on the first date...I don't even have words for you. Just...don't.

8. Similarly, if your master plan is to take your date to some chain restaurant at 4:30 pm on a Saturday (to beat the rush)...well, there are just too many things wrong with that sentence. I don't know where to begin. You're too far gone and I can't help you. I'm sorry.

9. If you want to kiss your date but your hand is bleeding and you go for it anyway so you wind up kissing her with your hand sticking out in the air so you don't wind up bleeding on her white coat...you're probably doing it wrong, but shoot, that's just too dang adorable to be wrong. Am I right?

So there you have it. Katy's go-to guide to dating. If you have done one of these things? No worries, now you know better. If you have done many of these things? Yikes. Just, stop. Like, immediately.

With all that said, I feel as though I've painted a horrible image of my dating life. I promise it's not all bad. In fact, quite the contrary. I could probably just as easily create a list of nine things that mean you're doing it right...but where's the fun in that? It's much more amusing to celebrate the fantastic failures.

Okay folks, that's a whopper of a Friday post. Exciting news: my baby sister and her roommates are flying in to visit me tomorrow! I'll try to keep up with the ol' blogging next week, but if I'm noticeably absent, you know why. Have a great weekend!

Thursday, May 10, 2012

pasta with mascarpone and roasted grape tomatoes


Oh, hey there. Good morning all. I apologize for the belated post today. What I'd like to tell you is that I have just been dominating some of my papers. I'd tell you about how I was so in the zone that I didn't eat or sleep or watch any HGTV. But, alas, these would be lies.

The truth? The truth is that I'm a silly girl who sometimes decides to drive up to Boston during finals week in the pouring rain. It just seemed like such a good idea. So, paper writing came to a halt and grading was put off for another day. Instead, I trekked up I-95, risking life and limb. And for what? I'll tell you what. Some homemade mac and cheese that rocked my world. Like, seriously rocked my world. I can't even talk about it right now. It brings a tear to my eye. (sigh)

So, yeah, after bragging about the amazing mac and cheese, I bring you...not the amazing mac and cheese. Rather, this pasta dish is a conglomeration of Katy's fridge finds. But it was delicious none the less. But, then again, anything with roasted tomatoes and mascarpone is okay in my book. Plus, bonus, I got to use chives from my herb garden! Yes, it's still alive...and thriving might I add! Go go Gardener Kate!

Anyway, maybe I'll try to wrangle that amazing mac and cheese recipe for y'all...I'll keep you posted. :)


Pasta with Mascarpone and Roasted Cherry Tomatoes

Ingredients:
2 pints cherry tomatoes, halved lengthwise
4 cloves garlic, peeled
kosher salt and freshly ground black pepper
olive oil
1 lb pasta shapes, such as shells
1 1/4 cups mascarpone cheese
pinch red pepper flakes
1/4 cup dry white wine
2 oz finely grated Parmesan cheese (1 cup)
1/4 cup minced fresh chives

Directions:
Preheat the oven to 400 degrees and line a baking sheet with foil.

Toss the tomatoes and garlic with 1 Tablespoon of olive oil, 1/2 tsp salt, and 1/4 tsp pepper. Arrange in a single layer on the baking sheet, and roast until slightly plumped, 15 to 20 minutes, stirring halfway through the baking time. Remove the garlic cloves and mince.

Meanwhile, cook the pasta in a pot of salted boiling water, until just shy of al dente, 8 to 10 minutes. Reserve 1 cup of the cooking water and drain the pasta. Transfer to a large bowl.

Mix the pasta with the mascarpone, stirring until melted. Add the cooking water, a little at a time, until the sauce looks thinned but not watery. Stir in the wine, red pepper flakes, garlic, tomatoes, half the Parmesan cheese, 3 Tbs of the chives, 3/4 tsp salt, and 1/2 tsp pepper.

Lightly grease 6 individual gratin dishes, or a 9x13 baking dish. Divide the pasta evenly among the dishes, then top with the remaining Parmesan.

Bake 15-20 minutes, until the pasta is golden and bubbly. Sprinkle with remaining chives and serve.

Serves 6
Source: Pink Parsley

Wednesday, May 9, 2012

nail polish trend: accent nails


With all the typing I've been doing lately, I am desperately in need of a manicure. I keep seeing manicures with accent nails and I am thinking I may need to make this happen after finals are over. I've done the clear glitter coat over my ring finger nail before, but that's about as wild as I've gotten with the ol' accent nail trend. Pretty weak. I plan to rectify that soon!

I suppose I've ordered the pictures in this post from least to most crazy. Pale pink with a bit of sparkle? Totally do-able. Metallic stripes and/or matte nails? A wee bit more challenging/daring. Full on glitter chunks plus bright aqua nails? I'll have to work my way up to that one.


What do you think? Do-able? I think yes. I'm especially loving the second from last with the gorgeous pink color and a medium glitter polish. That pink is perfect! If any of you do a manicure with an accent nail, send me pictures!

I'll be back tomorrow with a pasta recipe. As finals week drags on, I am avoiding grocery shopping at all costs. Dinner last night involved a whole lotta back o' the fridge finds. And guess what? It was awesome! Tomorrow I'll show you the results of that experiment...

Tuesday, May 8, 2012

marmalade muffins


So I made muffins. I think it may have been a procrastination tactic to avoid any more paper writing. After 15 solid pages of typing, my brain simply hit that point of no return. No more intellectual thoughts were emerging. When that happens, the only logical thing to do is bake muffins!

These particular muffins are deceivingly good. Sure the pictures look okay...like a standard muffin. But they taste sooo much better than that! There's orange zest all up in those muffins. Plus, once they're out of the oven, they're drizzled with a mixture of brown sugar and orange juice. It's a double whammy of orange!


I also want to note that today has been a big day for me...I brushed my hair AND shaved my legs. What?!? Yep, shaved my legs during finals week. Unheard of. Although, I am still in sweats. Whatever, can't win 'em all. Okey dokey, back to my studies.

Marmalade Muffins

Ingredients:
2 oranges
1/2 lb. (2 sticks) unsalted butter, softened
1 cup granulated sugar
2 large eggs
2 cups all-purpose flour
1 cup buttermilk
1 tsp. baking soda
1 cup firmly packed brown sugar

Directions:
1. Preheat the over to 375. Begin by grating the zest from the oranges.

2. Cream the butter and granulated sugar in a bowl with a mixer. Crack in the eggs and mix until well combined, about 4 minutes.

3. Sift the flour onto a sheet of wax paper. Add it to the bowl. Gently stir with the mixer using as few strokes as possible so the muffins aren't tough.

4. In a small measuring cup or bowl, combine the buttermilk and baking soda. Add the buttermilk mixture to the batter and mix until just combined. Add the orange zest and mix until just combined, being careful not to over mix.

5. Grease 36 mini-muffin cups (or 18 standard muffin cups) and fill each two-thirds full with batter. Use a cookie scoop to put the muffin batter in the tins. Bake for 12 to 17 minutes for mini-muffins (or 17-22 minutes for standard muffin cups), until light brown. Watch to make sure they don't get too brown.

6. Now, while the muffins are baking, prepare the glaze: Juice the 2 oranges you just zested. Add the orange juice and brown sugar to a medium bowl and stir together until just combined, but don't worry about dissolving the brown sugar completely. You want the glaze to be grainy and textured.

7. As soon as the muffins are done, drizzle the glaze all over the top. Be sure to thoroughly coat each muffin. Serve the muffins warm.

Yields 36 mini-muffins (18 standard muffins)
Source: Food Network Magazine May 2012

Monday, May 7, 2012

strawberry blondies


Study food.
It's paper-writing time in my world. I've finished teaching for the year. I had my last classes. Now is the time when I lock myself in my apartment and buckle down. This is my daily schedule:

Wake up
Type some stuff
Break to check Pinterest
Type more stuff
Break to blog
Type even more stuff
Go to bed

It's an exhilarating life I lead, I know. You'll notice the things that are omitted from this schedule:

Change out of sweatpants
Brush my hair
Shave my legs

Those things will NOT be happening during paper-writing time. Judge me if you will. That's fine. I'd judge me too.

However, while my personal hygiene has dropped a notch or two this week, I did make study snacks! Yay! There's walnuts and butterscotch chips and strawberry jam involved. Who cares about stubbly legs when you've got bars?!?

Strawberry Blondies

Ingredients:
4 Tbsp. unsalted butter
1 cup packed light brown sugar
1 1/2 tsp. vanilla extract
1 large egg, beaten
3/4 cup all-purpose flour
1/2 tsp. salt
1/4 tsp. baking powder
1/4 cup butterscotch chips
1/4 cup chopped walnuts
3 Tbsp. strawberry jam

Directions:
1. Preheat oven to 350. Line an 8-inch baking pan with foil, pressing it into the corners and up the sides; leave an overhang on two sides. Butter the foil.

2. Put 4 Tbsp. butter and the brown sugar in a large microwave-safe bowl. Microwave until the butter is melted, about one minute. Stir in the vanilla. Let cool slightly, then stir in the egg.

3. Whisk the flour, salt and baking powder in a small bowl. Stir into the butter mixture. Stir in the butterscotch chips and nuts and spread the batter in the pan. Drop dollops of jam on top and swirl with a knife. Bake until set, 20 to 25 minutes. Let cool 15 minutes on a rack, then lift the foil and transfer the blondes to the rack to cool completely. Remove the foil and cut into bars.

Yields 9 blondies
Source: Food Network Magazine May 2011

Friday, May 4, 2012

a tour of new england


Brunch al fresco.
So last weekend my good friend, Maudie, flew in from Kansas. She was only here 48 hours but we covered some serious ground in that time! I thought it might be fun to show you some of the sights from out weekend adventures. If anyone else is hankering for a tour of New England, let me know...I'm available for individual and group tours throughout the summer. ;)
Holy cannoli! I got a Florentine and a Peanut Butter. Both were amazing.
After lunch, our first stop was the North End to get some cannoli. Mike's Pastry has some wicked good cannoli. The one on the left is the Florentine and the one on the right is the Peanut Butter. Both were amazing! In fact, I wish I had some cannoli right now...

Boston gardens. So pretty!
We tried to walk off all our brunch by strolling down to Boston gardens and Boston common. This picture and the one below are taken in Boston gardens. It's such a gorgeous park right smack dab in the middle of downtown Boston.

Swan boats at Boston gardens.
Gorgeous old buildings everywhere.
After we'd seen the gardens, we spent some time walking through the neighborhoods nearby. There is so much gorgeous old architecture. Every building has so much character and I love that they are all covered in ivy. It just looks so quaint.

I want to move here. So picturesque.
New life goal: live in this building. I mean, how perfect is this little place with its red door and ivy and brick? (sigh) A girl can dream...

Cliff walk in Newport.
The next day, Maudie and I ventured to southern Rhode Island. We started the day at Narragansett Beach and then headed over to Newport to do the cliff walk (above), tour one of the old Vanderbilt mansions, and do a little shopping. Such a great weekend!

Rowdey's crab hat!
This last picture is NOT of New England, but it's too cute not to include. Maudie bought her son this little crab hat while we were strolling through Boston common. I died when she sent this picture. It absolutely made my day.

So I'll leave you with that. Have a great weekend. Live it up Cinco de Mayo style. Or live it up Kentucky Derby style. Or do both. Whatevs. Have a great weekend!

Thursday, May 3, 2012

best. salsa. ever.


So this is one of those recipes that people either LOVE or feel a little "meh" about. I just so happen to be in the first group. I could make a meal out of this salsa. In fact, I have...on many occasions. I could bathe in this salsa. I haven't done that...ever. But it seriously is just that good. You've been forewarned...this stuff is addictive.


One other warning, this recipe makes a huuuge bowl o' salsa. Not that that's a bad thing. However, if you are making this for one or two people, you might want to half it. Or don't. No judgment from this gal! But whether you make the whole enchilada or just go half-sies, you MUST make this for Cinco de Mayo this weekend. Okay? Mucho gracias!

Best Salsa Ever

Ingredients:
64 oz. Pace picante sauce (I use medium but it depends on your love of spice)
2 cans white corn, drained
3 cans black beans, drained and rinsed
1 cup sugar
1 bunch cilantro, chopped

Directions:
Place all ingredients in bowl and stir to combine.

Yup, that's all folks. Make it happen! Happy Cinco de Mayo!

Wednesday, May 2, 2012

beach bikinis

Source: Pinterest
Now that summer is drawing closer, my mind has shifted gears. No longer am I thinking about riding boots, chunky sweaters, and layers. Now, all I want is a wardrobe of new swimsuits and a lifetime supply of frosty beverages in my hand.

It's been many moons since I've treated myself to a new swimsuit. I suppose that's one of the downsides to being all grown. Everything just keeps fitting forever so it's tough to justify purchasing yet another new bikini. However, my online shopping trigger finger is getting itchy, which means that a new suit is probably in my near future. Here are a couple I've been eyeing.

The one above is a gorgeous color. Plus, I feel like that fringe is the perfect optical illusion to enhance certain bits and pieces. Perfect!

Source: Anthropologie
This one is bit girlier than my usual style, but I'm loving the mixed prints. Very preppy. Very "Newport Beach in the summer." I could rock that.
Source: Pinterest
This one provides another form of optical illusion: ruffles! Plus, the sea foam color would be so pretty on any skin tone.

Source: Where Is The Cool?
 Oh my goodness...how did this photo of me get on the Internet!?! Haha, no. I keed, I keed! However, I am slightly obsessed with the color of this bikini. I suppose it is in keeping with my recent obsession with all things neon yellow.

Source: Pinterest
Last but not least, I think this may be my favorite out of the bunch. What could be better than a ruffled, white bikini? Unfortunately, I found this one on Pinterest and the link is a dead end. If anyone locates this suit, please let me know! I may not rest until this white suit is mine!

So, those are my current options for my next big bikini purchase. Thoughts? Suggestions?

Tuesday, May 1, 2012

honey cream scones

Scone goodness.
Short post today. I had a fabulous weekend with my friend, Maudie. We spend Saturday in Boston seeing the sights. Sunday we made it down to Naragansett Beach, over to Newport, and even squeezed in a mansion tour before dinner. I was definitely sorry to see her go but it was a great weekend being a tourist in a place where I am normally kept busy with the daily grind.

However, this week marks the beginning of finals and I am already hopelessly behind. One poster presentation down. Two 15-page papers, one final exam, and 90 papers left to grade. Oy gevalt! It'll get done but in the meantime my posts may be a bit short. I'll return as verbose as ever after that last final gets handed in. :)

In the meantime, here are some scones to tide you over. I made these with herbs from my little herb garden (which is still alive by the way!). The recipe is one I photocopied out of an old waiting room magazine last summer. Maudie approved. I did too. Thank goodness for waiting room magazines, am I right?

Honey Cream Scones

Ingredients:
2 1/4 cups all-purpose flour
1/4 cup cornmeal
1 Tbsp. baking powder
1 1/2 tsp. finely shredded lemon or lime peel
1/2 tsp. salt
1 tsp. fresh rosemary, minced
1/3 cup butter, cut into small pieces
2 eggs
3/4 cup heavy cream
1/3 cup honey

Directions:
In a large bowl, mix flour, cornmeal, baking powder, lemon, salt, and rosemary. Using pastry blender, cut in butter until mixture resembles course crumbs. Make well in center of flour mixture, set aside.

In a medium bowl, combine eggs, heavy cream, and honey. Add egg mixture all at once to flour mixture. Using a fork, stir just until moistened. (Dough will be very sticky.)

Turn dough out onto baking stone or baking sheet covered in parchment paper. Pat or lightly roll dough into an 8-inch circle. Cut into 8 wedges.

Bake in a 400 degree oven for 15-18 minutes or until golden brown. Transfer scones to a serving plate. Serve warm.

Yields: 8 scones
Adapted from Midwest Living June 2011