Monday, December 31, 2012

nye sparkle

Happy New Year's Eve! 2012 was a helluva year, eh? Lots of changes, mostly for the better. I started this little blog, survived two more semesters of grad school, spent lots of time with family and friends, and had no lack of eventfulness in my love life. Plus the world didn't end, so that's pretty neat. All in all, I'd say 2012 was a success. Let's hope for an even better 2013.

Any big plans for this evening? Are you going to a big, fancy shindig? The kind where you pay a cover to get in, schmooze with party people, and maybe kiss a random stranger at midnight. Or are you doing something more low key? Good friends, some games, and plenty of good food. Or maybe you're opting out altogether? Sweatpants, take out, and a movie...that sounds pretty good, too. In fact, that sounds pretty dang appealing after the rush of the holidays.

I'll be doing my usual New Year's Eve thang. Me, some good friends, some beer Olympics, lots of snacks, and plenty of booze.

No matter your plans I thought I'd provide some New Year's Eve outfit suggestions. There's always a lot of pressure to have the perfect outfit for the big night. My solution no matter the occasion? Sequins. You can't go wrong when your outfit is bedazzled. Trust.

Sparkles Galore:
source: small shop studio
source: polyvore
source: la dolce vita
source: polyvore
Subtle Sparkle:
source: shopbop
source: prep-tacular
source: kate spade
source: gal meets glam

Be brave. I'll be rocking a sequined mini skirt this evening. Wear something you wouldn't normally. Have a fun and save New Year's Eve. I'll see you on the flip side!

Thursday, December 27, 2012

cinnamon sugar scones


So I know yesterday I promised that I was on a health food kick until New Year's. However, it didn't last long. You see, my willpower when it comes to such things is basically zero. Baked goods and appetizers are my weakness. Therefore, I stand before you today bearing scones. Cinnamon sugar scones, to be exact. Yes, I know they're not health food. But they seem appropriate for the cold winter mornings of winter break.

These past two days have been filled with last minute grading. Finals are in and I have until Friday to submit my grades. A teacher's work is never done. These scones are good brain food for my long days of grading. These, plus cup after cup of coffee are going to get me through. Coffee + scones = productivity.


One note: these scones call for cinnamon baking chips, which can be difficult to find. Whenever I stumble across some, I try to stock up. I definitely recommend that tactic. Enjoy!

Cinnamon Sugar Scones

For the Scones:
2 cups all-purpose flour
1 Tbsp baking powder
3 Tbsp granulated sugar
1 tsp ground cinnamon
½ tsp salt
5 Tbsp cold, unsalted butter, cut into ¼-inch cubes
½ cup cinnamon chips
1 cup heavy cream

For the Cinnamon Sugar Topping:
1 Tbsp heavy cream
2 Tbsp granulated sugar
1 tsp ground cinnamon

Directions:
Preheat oven to 425 degrees F. Line a large baking sheet with parchment paper or a Silpat and set aside.

In a large bowl, whisk together flour, baking powder, sugar, cinnamon, and salt. Cut in the butter, using your fingers, two knives, or a pastry blender. Mix until mixture resembles coarse meal, with mostly pea-size lumps of butter. Stir in the cinnamon chips. Pour heavy cream over the ingredients and stir with a spatula until dough begins to form. Don’t over mix.

Transfer dough to a floured countertop and knead dough by hand just until it forms a ball. Form scones by patting the dough into a ¾-inch thick circle. Cut the scones into triangles or use a biscuit cutter for round scones.

Place scones on prepared baking sheet. In a small bowl, combine sugar and cinnamon. Using a pastry brush, lightly brush the scones with heavy cream. Sprinkle scones with cinnamon sugar mixture. Bake scones for 12 to 15 minutes, or until light brown. Cool scones on a wire cooling rack and serve. Store leftover scones in an airtight container at room temperature for up to 2 days.

Yield: 6-8 scones

Wednesday, December 26, 2012

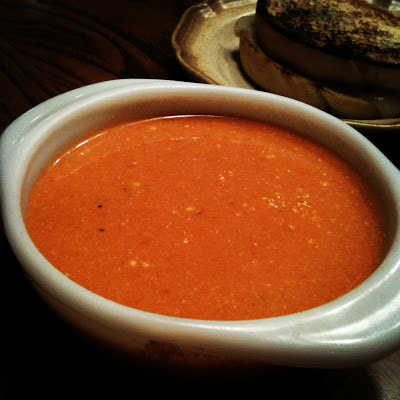
goat cheese tomato soup


Hope you all had a very merry Christmas! I don't know about you, but I seriously cannot look at one more sweet treat. I'm pretty sure I'm one piece of fudge away from diabetes. Just thinking about the quantity of cookies, candies, and booze I'm devoured in the last few days makes me slightly ill. I don't regret one bit of it though! Well, maybe I regret all that Toblerone I just dominated. But we won't go there.

Nevertheless, all I want in my mouth for the foreseeable future is health food. Fruits, vegetables, and whole grains. It's a rare moment that I have such cravings but I'm gonna roll with it. My current distaste for sweets combined with all this cold Kansas weather is giving me crazy cravings for soup.

This goat cheese tomato soup is one of my favorite go-to soups. It's hard to beat tomato soup. Not "out of the can" condensed tomato soup. I mean homemade, freshly pureed tomato soup. Delicious, no doubt. But add heavy cream and goat cheese? Now we're talking my kind of soup. This plus grilled cheese is one of my favorite cold weather meals.

Plus, this is the perfect antidote for the current sugar overdose we're all suffering from. For anyone who ate one too many candy canes the past few days, I prescribe a big ol' bowl of this immediately. Enjoy!

Goat Cheese Tomato Soup

Ingredients:
2 Tbsp olive oil
1 cup yellow onion, diced (about 1 onion)
2 garlic cloves, minced
1 (28 ounce) can of whole tomatoes (in juice)
1 Tbsp tomato paste
1/2 tsp sugar
3 cups chicken stock
1/2 tsp kosher salt
1/2 tsp freshly ground pepper
1/4 cup heavy cream
3 ounces goat cheese, softened

Directions:
Heat the olive oil in a large, heavy-bottomed pot over medium-low heat. Add the onions and saute for about 5-7 minutes, or until translucent and tender. Add the garlic to the top of the diced onions and cook for about 1 minute, or until fragrant.

Add the tomatoes, tomato paste, sugar, chicken stock, salt, pepper, and stir. Cook the soup for 15 to 20 minutes.

In batches, carefully transfer the tomato mixture to the blender. Blend on low, being sure to let steam escape. When you’re done blending it all, transfer it back to the soup pot. Alternatively, you can blend the mixture in the pot using an immersion blender. (Note: This soup has a little texture. If you don’t want that, simply place a sieve onto the pot and pour the mixture through–it’ll be much smoother with no tomato pulp.)

Reheat the soup just until hot. Mix in the heavy cream and goat cheese. Serve.

Yield: 4-6 servings

Monday, December 24, 2012

grandma bee's peanut brittle

Happy Christmas Eve people! I hope you all have your shopping done, your presents wrapped, and your big meal planned. However, if you are in need of a last minute Christmas treat, you should probably make this peanut brittle. It is a Burton family tradition. My dad is the brittle expert 'round these parts. He's guest posting here today to give you the 4-1-1 on the very best peanut brittle...his peanut brittle.

Christmas is not rightly celebrated without certain traditions being observed. A proper watching of Charles Dickens' "A Christmas Carol" is always a must. However, that opens us up to the discussion of which version?  Lighter tellings have featured Smurfs, Barbie, Mickey Mouse and Jim Carrey, but only "A Muppet Christmas Carol" deserves mention from this category.  Michael Caine was great and you gotta love Gonzo and the rat.  Plus, it's a first rate musical.

The real competition is with the serious acting and I know Reginald Owen and Patrick Stewart have their fans as they take their turns at representing the miserly Scrooge.  

Truly Alistair Sim must be considered one of the best Scrooge's but I lean toward the 1984 film with George C. Scott. It is my favorite but I must admit they all have some redeeming quality. Well, I'm still looking for something positive in Carrey's version.

Christmas treats are like that. Certain candies or cookies only seem right at Christmas.  Candy canes, fudge, frosted cookies and the like are all favorites but it's just not Christmas without Grandma Bee's Peanut Brittle.  Don't tell me its bad for you, she made it to 100.


It works best to ready the work area and measure everything before starting.  When the peanuts are cooking, it's easier to have things ready to dump.  That includes greasing two cookie sheets or spraying them with cooking spray.  Remember to put hot pads under each, as these pans get hot!


In a large ( 5 qt. ) stockpot, bring the first three ingredients to a boil and stir constantly.  Occasionally raise the spoon and let drip.  When the drips develop long threads, allow a drop or two to fall into ice water.  After a few seconds, fish the drop out and chew it.  If chewy or sticky, continue cooking, checking frequently.  When it cracks easily, you are ready to dump in the raw peanuts.  Use a thermometer if you like, but this was Grandma Bee's way and it works.  Continue stirring at a boil and if need be, raise the stove temperature slightly.  Add the remaining ingredients except the baking soda.


Continue stirring for 5 to 10 minutes to cook the peanuts and darken the sugar.  You want the color of the sugar mixture to darken, but only slightly, as the brittle will get darker after it cools.  When the sugar mixture is light brown, add the baking soda and stir vigorously.  The volume of the mixture will triple and that's why you want a large pot to begin with.  After stirring for half a minute, divide the mixture between the two cookie sheets and spread with a spoon.  Use very heavy hot pads and take care as I can only imagine how bad a sugar burn would be.  To enhance the flavor, lightly sprinkle with salt.


After properly cooling, a blunt handle of a butter knife makes easy work of breaking up the confection, and you are ready to settle in with a few pieces and prepare for Ebenezer and the three ghosts.
Merry Christmas !!!


Grandma Bee's Peanut Brittle

Ingredients:
2 cups sugar
1 cup corn syrup
1/2 cup water
2 cups raw peanuts
1 Tbsp butter
1 tsp vanilla
Pinch of salt
2 tsp baking soda

Directions:
Spray two baking sheets with non-stick cooking spray. Set aside.

Combine sugar, corn syrup, and water in a large pot over medium heat. Bring to a boil, stirring constantly until mixture reaches hard crack stage (300-310 degrees F).

Add peanuts, butter, vanilla, and salt. Cook until mixture begins to brown, about 10 minutes, stirring constantly.

Stir in baking soda and quickly pour mixture onto prepared pans, spreading into a thin layer.

Source: Burton original

Saturday, December 22, 2012

pecan praline fudge


We're in full on Christmas baking mode here on the Burton ranch. And what's more Christmas-y than fudge? I mean besides the baby Jesus and Santa Claus and whatnot. But besides all that, the fudge is where it's at, am I right? Yes, I am.

Here's the thing about fudge. It makes me feel like an official candy making genius whenever it comes out right. There is a candy thermometer involved, constant stirring, soft ball and hard ball stages, and copious amounts of hot sugar. Fudge making can be a bit of a precarious activity. But, when it comes out right, it's so worth it.

Have I just scared you out of making this? Don't be scurred. Invest in a candy thermometer (they're like a couple bucks, totally worth it), don't walk away from your boiling pot of molten sugar, and just keep stirring. You'll be fine. Plus this fudge is pretty intensely awesome. There are pecans and toffee bits involved. I mean, if that doesn't sell you on this fudge, I don't know what will, quite honestly.

Next up? Peanut brittle. My dad is the official peanut brittle aficionado in our family so this next post will be straight from dear ol' dad. Stay tuned!

Pecan Praline Fudge

Ingredients:
1 3/4 cups firmly packed brown sugar
3/4 cup whipping cream
1/4 cup butter
1 (7-ounce) jar marshmallow créme
1/2 cup butterscotch-flavored baking chips
1 cup chopped pecans
3/4 cup toffee bits
1 tsp vanilla
Pecan halves, if desired

Directions:
Line 9-inch square pan with aluminum foil, extending foil over edges. Spray foil with no-stick cooking spray; set aside.

Combine brown sugar, whipping cream, butter and marshmallow crème in 3-quart nonstick saucepan. Cook over medium heat until mixture comes to a full boil (8 to 12 minutes). Continue cooking, stirring constantly, until candy thermometer reaches 240°F. or small amount of mixture dropped into ice water forms a soft ball (6 to 8 minutes).

Using wire whisk, quickly stir in butterscotch chips until melted. Remove from heat; stir in chopped pecans, toffee bits and vanilla.

Pour mixture into prepared pan. Top with pecan halves, if desired. Cool completely; cut into 1-inch squares.

Yield: ~64 pieces of fudge

Friday, December 21, 2012

holiday gift guide: for him

My creating a gift guide for men is slightly amusing to me. Chiefly because I struggle every Christmas and birthday to find the perfect gift for the men in my life, namely my little brother and my dad. However, over the years I've made a science of male gift buying. For my dad? Anything that will aid in grilling or smoking a piece of meat. In lieu of that, I go for San Francisco Giants paraphernalia. Done.

My brother, on the other hand, is a bit more challenging. I typically go for a guy essential such as the monogrammed glasses below or a nice heavy grill pan plus accessories. Outside of that, I go for clothes. My brother has very specific style opinions so it's always a (welcome) challenge to find something that he and I both approve of.

This gift guide lists some of my go-to guy gifts...plus a few more that I just couldn't resist. I mean, a plaid iPhone case? Just stop. And that Michael Kors watch and J.Crew satchel almost make me wish I were a dude. Almost.

monogrammed old-fashioned glasses :: Etsy $36
plaid phone case :: Jack Spade $40
leather billfold :: J.Crew $45
crewneck sweater :: J.Crew $80
iGrill :: Shopper's Choice $89
silver cuff links :: J.Crew $98
monogrammed grilling tools :: Williams-Sonoma $115
leather watch :: Michael Kors $225
aviator sunglasses :: Jack Spade $295 
leather satchel :: J.Crew $375 
If you still have some last minute shopping to do, good luck! I'll be back for a few extra holiday-themed weekend posts. Happy Friday!

Thursday, December 20, 2012

holiday gift guide: for her

For those of you poor suckers who are down to the wire on your holiday shopping, I thought I'd throw together a few last minute gift guides. Better late than never, right? First up? Gifts for her. Here's a sampling of items that would make the perfect gift, in my humble opinion at least. The items are arranged from least to most expensive and there are options for almost every budget. Links are included beneath each item. Happy shopping!

tea towel set :: Nesta Home $23.50
stationary set :: Kate Spade $24

iphone case :: Kate Spade $40
embossed bar necklace :: Momentus New York $43
stemless wine glasses :: Design Public $52
initial ring :: Catbird $96
leather wallet :: Kate Spade $228
leather hobo :: J.Crew $248
cashmere sweater :: J.Crew $298

kitchenaid stand mixer :: Amazon $319
Back tomorrow with a gift guide for guys!

Wednesday, December 19, 2012

chocolate peppermint blossoms + chocolate bourbon balls


I'm baaack! I know my long absence is inexcusable. Between finals, grading, traveling back home for Christmas, and a few long good-byes it's been some long weeks of pure insanity. Nevertheless, between all that craziness I did have time for a cookie swap last Friday night and I made these Chocolate Peppermint Blossoms plus a batch of Chocolate Bourbon Balls.

Now that the semester is largely over there is much more cookie baking/candy making/crafting to come. But, in the meantime, here are a few recipes to get your started...

Chocolate Peppermint Blossoms

Ingredients:
1 1/2 cups all-purpose flour
3/4 cup Dutch-process cocoa
1 1/2 tsp baking powder
1/4 tsp kosher salt
1 stick (1/2 cup) salted butter, cut into chunks
1 1/4 cup sugar
3 eggs
1/2 tsp vanilla
1 tsp peppermint extract
1/2 cup powdered sugar for rolling
Hershey's Candy Cane Kisses

Directions:
Line cookie sheets with parchment. Preheat oven to 350.

Whisk together the flour, cocoa, baking powder and salt. Set aside.

With an electric mixer, cream the butter and sugar until light and fluffy. Beat in the eggs and extracts, beating until combined and scraping down the sides and bottom of the bowl as needed.

Gradually, add the flour mixture, beating on low just until combined. The mixture will be very sticky.

Place the bowl in the refrigerator and chill for 30 minutes to 1 hour.

Use a teaspoon cookie scoop (or a spoon) to scoop generous teaspoons of dough onto the prepared cookie sheets. Place the powdered sugar on a plate.

Gently roll each ball of dough through the powdered sugar until coated.

Place back on the cookie sheet.

Bake for 12 minutes, until puffed and crinkly. (Meanwhile, unwrap the Kisses.)

Remove from the oven and immediately press a Hershey's Kiss on top of each hot cookie. Press firmly, so that it doesn't pop off. Let the cookies sit on the sheet for 1-2 minutes, then remove to a wire cooling rack to cool completely.

Yield: ~2 dozen
Source: slightly adapted from Bake at 350

~~~~~~~~~~~~~~~~~~~~~~~~~~~~~~~~~~~~~~~~~~~~~~~~~~~~~~~~~~~~~~~~~~~~~~~~~~~~~~~~~~~~~~~~~~~~~~~~~~~~

Chocolate Bourbon Balls

Ingredients:
2½ cups vanilla wafer crumbs – like Nilla wafers
½ cup powdered sugar, sifted
1 cup pecans, finely ground in food processor
6 ounces semisweet chocolate, broken into pieces or chips
½ cup bourbon
3 Tbsp light corn syrup
Granulated sugar, for rolling

Directions:
Place cookie crumbs, powdered sugar and ground pecans in a large bowl and stir to combine.

Melt the chocolate in the microwave (30 second increments at 50% power, stirring after each, until completely melted and smooth). Stir in the bourbon and corn syrup. Add the chocolatemixture to the dry mixture and stir well to combine. Let sit for 30 minutes. Place some granulated sugar in a small bowl and set aside.

Roll the mixture between your palms into 1-inch balls (I used my small cookie scoop), then roll in the granulated sugar to coat. Place the balls in an airtight container, separating layers with aluminum foil or wax paper, and allow flavors to develop by sitting at room temperature overnight. Place in small paper cups to serve, if desired.

Yield: ~3 dozen balls

Thursday, December 6, 2012

three bean chili pot pies


I survived the last week of school for the semester!!!! Can we all breathe a huge sigh of relief? (sigh) After two presentations, countless meetings, and some speed grading, all I want right now is pajamas, wine, and a Christmas movie marathon. Apologies for the lack of posts this week. But I'm back now. And next week I'm planning a full week of non-food related posts! Look forward to some fashion posts and a new series of Christmas gift idea posts. Yay!

Okay, now back to our regularly scheduled program:

Have I ever told you my all-time hands down favorite meal? Like, if I were on death row I would ask for this over anything else meal? It's chili and cornbread. What can I say? I'm a simple gal. I'm rather particular about my chili and cornbread too. I'm a chili/cornbread diva, if you will. The chili has to be thick and spicy and hearty. I simply will not settle for watery, bland, or otherwise wimpy chili. No ma'am. And the cornbread? Well, it needs to be sweet. Dry, tasteless cornbread should be a crime. Amen.

I'm always on the hunt for the next great chili or cornbread recipe. And, when I saw this recipe posted over at How Sweet It Is, I knew that Jessica must be a girl after my own heart. Chili and cornbread combined into one super awesome pot pie? Duh. Why didn't I ever think of that? (sigh)

Three Bean Chili Pot Pies

Three Bean Chili:
1 sweet onion, diced
1 red bell pepper, diced
1 green bell pepper, diced
2 Tbsp olive oil
2 bulbs roasted garlic
2 (15 oz) cans cannellini beans, drained and rinsed
1 (15 oz) can pinto beans, drained and rinsed
1 (15 oz) can kidney beans, drained and rinsed
2 (28 oz) cans crushed tomatoes
1 Tbsp tomato paste
2 Tbsp chili powder
1 Tbsp cumin
1 Tbsp unsweetened dark cocoa powder
1 Tbsp brown sugar
1/4 tsp salt
1/4 tsp black pepper
1/4 tsp cayenne pepper

Cornbread Biscuits:
1 1/2 cups finely ground cornmeal
1 1/2 cups whole wheat pastry flour
1 Tbsp baking powder
1 Tbsp granulated sugar
1 tsp baking soda
1 tsp salt
1/4 cup (1/2 stick) cold unsalted butter, cut into chunks
1-1 1/4 cups milk
heavy cream for brushing

Directions:
To prep, roast two garlic bulbs. Cut the top off each garlic bulb. Drizzle with olive oil and wrap in foil. Roast at 375 for 45 minutes. This can also be done ahead of time.

Make the chili: Heat a large skillet over medium heat. Add olive oil along with onions and peppers. Cook until soft, about 5 minutes. Squeeze out roasted garlic cloves into the pot, and stir well to combine with a large spoon, breaking them apart and evenly distributing the garlic paste. Add in beans, crushed tomatoes and tomato paste, stirring well. Add in spices, cocoa, sugar, salt and pepper, then let simmer for 5-10 minutes. Taste and season additionally if desired. At this point, you can make the pot pies immediately or simmer your chili for however long you would like to develop the flavor.

Preheat oven to 375 degrees F.

Make the cornbread biscuits: In a large bowl, combine flour, cornmeal, sugar, baking powder, baking soda, and salt. Whisk well to combine. Add in cold butter and using a fork, pastry blender or your fingers, mix and combine until the butter is distributed and small crumbs remain. Stir in one cup of milk to start to form a dough. The dough will be slightly more crumbly that traditional biscuit dough. If it is still very dry, add in additional milk one tablespoon at a time. Form dough into a ball.

Place dough on a floured workspace and using your hands and/or a rolling pin, flatten it out until it's a little less than one inch thick. Use a glass or biscuit cutter to cut out rounds. Using a standard biscuit cutter should give you approximately 12 biscuits. The size of the biscuits will determine how many you make. I made 4 individual rectangular ramekins and one large potpie in a 9x9" baking dish.

Assemble pot pies: Ladle chili into ramekins and/or baking dish, filling almost to top. Place cornbread biscuits atop the chili. Brush the tops of the biscuits with heavy cream, then bake for 12-15 minutes or until biscuits are slightly golden and set. Top with sour cream, Greek yogurt, chives or any toppings you desire.

Yield: chili serves approximately 8, biscuit recipe makes 12 standard size biscuits

Thursday, November 29, 2012

broccoli cheese & cracker casserole


Amidst the frenzy that was our Thanksgiving dinner, I got a mere one shot of the feast. Had I attempted to hold back my siblings for even a minute more, Lord knows I would have lost an arm...or at least a finger. However, despite the lack of pictures, I still felt it imperative that I share this particular recipe with you. Everything we had on Thanksgiving was good. But this Broccoli Cheese & Cracker Casserole? Well, you can't really go wrong when there is Velveeta involved.

Yes, this is one of those totally unhealthy but totally addictive vegetable dishes. I'm fairly certain that the virtue of eating broccoli is completely ruined by the copious amounts of Velveeta, heavy cream, and crackers that go into this casserole. And that's fine. This is definitely a special occasion/holiday dish. Don't go eating this every night and you'll be golden. But just know that you may be tempted to dive head first into a pan of this. I halved the original recipe (reflected in the recipe below), but you may just want to double this sucker. You can thank me later. :)

Broccoli Cheese & Cracker Casserole

Ingredients:
1 1/2 pounds broccoli, cut into florets
1 pound Velveeta
1/4 cup milk
2 Tbsp heavy cream
salt and black pepper to taste
1/8 teaspoon cayenne pepper (more for more spice)
1 1/2 sleeves club crackers

Directions:
Preheat oven to 350 degrees. Place crackers into a large ziploc bag and crush slightly, leaving some large chunks. Set aside.

Plunge broccoli into boiling water and allow to boil for 1 minute. Strain and set aside.

Cut Velveeta into chunks. Throw into a large pot with milk, cream, salt, pepper, and cayenne. Melt, stirring occasionally, until totally smooth.

Add broccoli to cheese sauce, then add half the cracker crumbs. Stir to combine, then pour mixture into a buttered baking dish. Top with remaining cracker crumbs, then sprinkle the top generously with black pepper.

Bake for 15 to 20 minutes, or until top is golden brown and casserole is bubbly.

Yield: 6-8 servings

Wednesday, November 28, 2012

chai pear scones


I forgot about pears. That sounds weird but whatever it's true. I got too worked up about apples this fall and I plum forgot about the danged pears! What a tragedy. Never fear, though, a delicious Ham Pear Arugula Grilled Cheese I devoured last weekend reminded me of the glory that is the pear. So I promptly went out and bought a metric ton of pears.

My first pear experiment was these scones. I've mentioned before that scones are kind of my thang. I love baking them. Love eating them. They're just my fave and it's high time I made a pear scone, right? So I did. This recipe tastes like fall but in a different way. Apples are switched out for pears and the traditional cinnamon spice is pumped up with ginger, cloves, nutmeg, and allspice. Add some cardamom if you have it, but have you priced cardamom lately? Ridic. Like $15 for a jar. That's not happening. But these scones will be amazing with or without the cardamom.

Let's just all agree to not forget pears, okay? :)

Chai Pear Scones

Ingredients:
2 cups all-purpose flour
1/4 cup granulated sugar, plus extra for sprinkling
1 tablespoon baking powder
1 tsp ground cinnamon
1 tsp ground ginger
1/2 tsp ground cloves
1/4 tsp ground nutmeg 
1/4 tsp ground allspice
Pinch of freshly ground black pepper
1/2 tsp salt
6 Tbsp butter, cut into small pieces
3 large ripe pears, peeled and cut into small pieces
1 large egg
1 teaspoon vanilla extract
1/2 cup heavy cream

Directions:
Preheat oven to 350 degrees F (180 degrees C).

In a large mixing bowl, whisk together flour, sugar, baking powder, spices, and salt. Cut in butter with pastry blender or your hands until mixture resembles coarse sand. Stir in pear chunks. Set aside.

In a small bowl, beat together egg, vanilla, and heavy cream. Pour over the scone batter and lightly mix until the dough comes together. Add additional cream or flour as needed.

Turn out dough on a lightly floured surface, form a circle, and flatten it until it is about 1-inch thick. Using a sharp knife, cut 8 equal pie wedges. Transfer scones to a baking sheet using a flat spatula and sprinkle the tops of the scones with a little granulated sugar. Bake for 20-25 minutes, or until lightly browned. Serve warm or at room temperature.

Yield: 8 scones
Source: slightly adapted from The Pastry Affair

Tuesday, November 27, 2012

orange marmalade rolls


Did any of you go Black Friday shopping? I'm concerned that the Black Friday situation is seriously out of control. I don't think I've ever truly experienced Black Friday at its worst. The craziest I've gotten is a little late morning mall shopping. Let me tell you about the 8 person line at the Gap...craziness! :)

I'm much more comfortable with this new Cyber Monday tradition. No crazed strangers hassling me. No lines. No judgment from the sales people when I spend 17 hours deciding which color skirt I like best. No crying babies and/or screaming toddlers. Blech. I just can't deal. Cyber Monday is superior in ever way, shape, and form. Shopping from the comfort of my sweatpants. Enough said.


Anyways, I'm sure all you virtuous angels out there are detoxing and cleansing and whatnot during this brief downtime before the holiday season really gets under way. Good for you. I've been eating cinnamon rolls and downing copious amounts of red wine. What? That's what the gym is for.

If you are currently on a health food spree, tuck this recipe away for later days. You'll be glad you did come Christmas time. Trust. I made these for my brother and sister when they came to visit last week. By the time they left, there was one left. Just one. Three people. Two days. One remaining orange roll. Not to worry, I dominated it as soon as they left. These orange rolls don't stick around for long.

Orange Marmalade Rolls

For the Rolls:
2 cups whole milk
1/2 cup vegetable oil
1/2 cup sugar
1 package active dry yeast or 2 1/4 tsp active dry yeast
4 cups (plus 1/2 cup extra, separated) all-purpose flour
1/2 tsp (heaping) baking powder
1/2 tsp (scant) baking soda
1 tsp (heaping) salt
8 Tbsp orange marmalade
1/2 cup melted butter
1 cup brown sugar
1/2 teaspoon kosher salt

For the Glaze:
1 pound powdered sugar
3 Tbsp melted butter
1/4 cup milk
1/4 cup orange juice
1 dash salt

Directions:
For the dough, heat the milk, vegetable oil, and sugar in a medium saucepan over medium heat to just below a boil. Set aside and cool to warm, approximately 30-45 minutes. Sprinkle the yeast on top and let it sit on the milk for 1 minute.

Add 4 cups of the flour. Stir until just combined, then cover with a clean kitchen towel, and set aside in a relatively warm place for 1 hour. (I usually put my dough in the oven, set over a pan of hot water.) After 1 hour, remove the towel and add the baking powder, baking soda, salt, and the remaining 1/2 cup flour. Stir thoroughly to combine. Use the dough right away, or place in a mixing bowl and refrigerate for up to 3 days, punching down the dough if it rises to the top of the bowl. (The dough is easier to work with if it’s been chilled for at least an hour or so beforehand.)

Preheat the oven to 375°F.

To assemble the rolls, remove dough from the pan/bowl. On a floured baking surface, roll the dough into a large rectangle, about 30 x 10 inches. The dough should be rolled very thin. Spread marmalade over the top. Pour on butter, and then sprinkle on the brown sugar evenly. Sprinkle with salt.

Beginning at the long side farthest from you, roll the dough in a long roll toward you; being careful to keep it tucked tightly. Pinch edge to seal.

Cut rolls into 1 to 1 1/2 inch rolls and place into a buttered 9x13" pan or two 9" round pans. Allow to rise for at least 20 minutes.

Bake at 375 degrees for 15 to 18 minutes, or until golden brown (but not overly brown).

While baking, mix together the ingredients for the orange glaze, thinning with more milk or orange juice to make mixture thin enough to be pourable.

Immediately drizzle orange glaze over the top. Serve warm or at room temperature.

Yield: 12 servings

Monday, November 26, 2012

thanksgiving weekend in pictures

Hey there! Hope you had a fabulous Thanksgiving weekend filled with lots o' food, great times with family and friends, and maybe even some awesome Black Friday deals? Here's my weekend in Instagram...

sister friends reunited
Quincy Market in Boston 
sibling pic
a stroll through Boston Common
the last few leaves of autumn
birthday festivities
feast! 
my heaping plate and my goofy brother
homemade soup and grilled cheese on a cold Saturday
Happy Cyber Monday! Here's to the holiday season!