Showing posts with label DIY. Show all posts

Monday, October 29, 2012

pumpkins gone wild


So I finally got around to pumpkin carving. Better late than never, right? After the craziness of midterms week, I was in desperate need of some rest and relaxation this weekend. Although I didn't get too much of either, I did squeeze in time for a couple scary movies, a few great meals, plenty of wine, and some Sunday afternoon pumpkin carving.

This cannibalistic pumpkin-eating pumpkin idea was inspired by this particular pin. While it's not an exact replica, I'm pretty pleased with the results! And just in time for the trick or treaters!

That is...if Frankenstorm doesn't blow us away first. Amidst my weekend fun, I also squeezed in time to stock up on necessities before good ol' Hurricane Sandy comes to town. Canned soup, bottled water, and candles. What more could a gal want? Oh yeah, and plenty of Pumpkinhead Ale. Bring it on, Frankenstorm. :)

God willing I'll still be able to do my regular posts in the upcoming days. However, if I'm noticeably absent, just know that I'm most likely without power. Please send fresh supplies of Pumpkinhead Ale as soon as possible. Rations are most likely low.

Thursday, October 18, 2012

diy: spiderweb pumpkin


Last weekend the roomie and I hit up a pumpkin patch. It was basically the cutest thing I've ever seen, complete with fresh baked pies, pumpkins of every kind, and hay rides. I left with more pumpkins than I could carry and last night I FINALLY decorated one of 'em! One down, a million to go.

I got this idea from Pinterest and it was so easy I didn't think it warranted a full step-by-step post. So, instead, here's pumpkin-decorating in pictures. As you can see above, it all began with a pumpkin and a beer...as all good things do. :)


Step one, paint the whole dang thing black. Stem and all. My roommate got a little wild and did a green one as well. We just used cheap-o fabric paint for these but I'm sure anything would work. Spray paint would probably make this step go a bit faster, too.


And, finally, add your spiderweb. I did mine with a silver paint pen but a silver Sharpie would probably work just as well, too. This step would have been easier had my pumpkin had grooves but the dang thang was smooth as a baby's butt. So I improvised and eyeballed the vertical lines. Then I just connected them with diagonal lines to make a chevron pattern.

That's it...done! Easy peasy lemon squeeze-y. Happy Halloween!

Tuesday, October 9, 2012

pretty pumpkins

source: wild ink press
I'm still playing catch up after my big weekend back home. If you suddenly stop seeing posts, just know that I was suffocated by a mound of paperwork and textbooks. Notify the authorities...and my parents. And I will miss you all so much.

Let's keep our fingers crossed that that doesn't happen, though. Okay?

Until I have enough free time to cook/bake/craft something original to send your way, I'm going to attempt to distract you with shiny objects. Look, glittery pumpkins! Is it working?

This coming weekend, I'm hoping to go pumpkin picking and these ideas, gathered from Pinterest, are hopefully in my future. What do you think? Enough glitter for one weekend?

source: twig & thistle

source: martha stewart

source: funkytime
Links are embedded in each photo caption. Happy Tuesday!

Tuesday, September 4, 2012

ribbon bulletin board

source: houzz
So, as with many of my craft project, this one began with Pinterest. With the image above to be exact. I love so many things about this picture...the yellow chair, the orange coat rack, those awesome Hunters. However, what really caught my eye was that amazing ribbon bulletin board. So, guess what? I made one of my very own! And guess what else? It was the easiest thing. Ever. You should make one, too.

You'll need:
  • a frame
  • primer, top coat, and spray paint in your choice of color
  • ribbon in your choice of color
  • hot glue gun and glue
  • binder clips

Here's the step by step:


Step One: Find a frame. Here's mine. You may remember this particular frame from earlier this spring when I went on a kelly green spray paint binge. I still love that color but it just doesn't work in my new place. Plus, that cork board has seen better days. So, time to spruce it up! I just knocked out the cork board before I started painting.


Step Two: Painting time. I coated my frame in two coats of primer, two coats of gold spray paint, and a top coat. Let dry.


Step Three: Hot glue lengths of ribbon haphazardly across the back of the frame, adding more and layering to your taste. Let dry.


Step Four: Use binder clips to attach papers/clippings/photos/etc to ribbon. I couldn't find any gold binder clips so I just bought silver ones and spray painted them with the same gold spray paint I used on the frame.


Voila! So pretty, right? It looks so much better on my desk than the old green monstrosity. What do you think? :)

Thursday, August 16, 2012

jewelry making on a budget


source: ruffled
I'm in an awkward in-between period. No, not adolescence or puberty or "on a break" ala Ross and Rachel. No, I'm back in the Baby State, yet my job (aka: the school year) has not yet started, which means that my paychecks have not yet started. Thus, I've been on a major spending strike. My money is locked down! Like a vault, BABY!

This means eating out is rare. Shopping is limited to groceries and necessities. Day trips up to Boston have been all but eliminated. But don't you feel sorry for me, world! I still have my beach days. I still have my girl nights of dinner and a Red Box...or Shark Week as it may be. And, I still have my cooking and I have my crafting. I'm a happy girl. You can't keep me down world!

Lately I've been looking for some new fun accessories that I can make on the cheap. Here are some of my most recent Pinterest finds. Any and/or all of these DIY crafts are on my to-do list for the next few weeks. Just click the source to be directed to the original tutorial.

Ruffled necklaces, studded bracelets, stacked pearls, and neon rhinestones...oh my! I'm ready to get my craft on. How about you?

source: martha stewart

source: p.s. i made this

source: passion for fashion

Monday, August 6, 2012

chair revival


As you read this, I am flying back to Rhode Island. After spending the last six weeks or so in Kansas, I have to admit that I'm ready to return to my cool Rhode Island weather. However, I'm already missing my family and friends. Can't wait to see you all this fall!

My last weekend back home was a whirlwind. I attended the Frontier Western Celebration in my hometown complete with Mutton Bustin' and Hog Waller. Yes, that's right, Hog Waller. :) My dad took Grand Champion in a local BBQ competition (his second Grand Champion this summer!). My baby sister came home from Dallas and we had two full days of sister bonding. And my friend Renee and I finally finished our reupholstery project. Whew!

So, today I bring you our before and after. Because who doesn't love a good before and after? I posted the before picture a few weeks ago when we first started this project. Really take in the beauty of that olive green crushed velvet. Look at the gorgeous tufting. And that rich mahogany on the legs and other decorative wood accents. She's a real diamond in the rough, eh?

And...the after:


I love the shape of this chair. But it was a beast to take apart, as usual. Once we got it torn down to the padding, the first order of business was to prime and paint the legs, which were horribly scuffed up. I love the white we ended up going with. It's perfect with such a bright fabric.

Speaking of fabric, this chair is destined for Renee's second-grade classroom so she went with a bright, fun chevron fabric. Bonus: it was only $9/yard! We found this fabric online at fabric.com and it was the perfect choice.


We also decided to get rid of the original tufting and tucks. The fabric we chose is so bright and busy that tufting would have been a bit much. I think we are both really happy with the way this chair turned out. However, I've said it before and I'll say it again...I wouldn't want to tackle another reupholstery project for a LOOOONG time.


As I've noted before, reupholstery is one of those things that you just have to feel your way through. Every piece is different. The important thing is to take tons of pictures as you go and keep the original fabric pieces so that you can refer to those as you put the puzzle back together. Renee and I would have  been lost had we not done this. More than once, we had to pull out an original piece of that nasty green fabric or bring up a photo of the original upholstery to reference.

Other than that advice, just feel your way through it and work slowly. Believe me when I say that upholstery is never a fast process.

Okay, I'll be back with more recipes tomorrow, posting from The Baby State once again. Happy Monday everyone!

Wednesday, July 25, 2012

diy growth chart


So I went to a baby shower last weekend. I'm not so good at baby showers. I mean, I sit there politely and eat the food and hold the babies and whatnot. But I seriously SUCK at talking babies. You know, like feeding schedules and breastfeeding vs. bottle feeding and colic and diaper changing and husbands and stretch marks. That type of subject matter is NOT my forte. As soon as baby talk begins I take one of two tacts.

Tactic #1: Sit in polite silence and feign interest in the apparent nuances between babies' eating/sleeping/crapping habits, nodding attentively so as not to reveal that I'm really contemplating my next date night outfit or whether it's appropriate to make mixed drinks at a baby shower or why I'm not more tan or something important like that.

Tactic #2: Exercise my role as token childless guest and insert my own personal brand of inappropriate jokes and witty comments. I should mention that this is the tactic I usually choose. Or, even better, if there is another childless guest, I engage in some clever banter to distract us both from a diaper discussion.

However, inappropriate jokes and wit are rarely, if ever, appreciated in the world of baby showers. It's a crying shame really. Everything is so much better with inappropriate jokes and wit. I just can't win.


One thing I am good at, though? Gifts. DIY gifts, to be exact. Like these DIY growth chart kits I made for my friend Maudie. They were a huge hit...despite my otherwise inappropriate and witty behavior.

Here's what you'll need for each growth chart:

  • two yards of jute webbing (I found mine at an upholstery shop for $1.25/yard)
  • permanent marker
  • ruler
  • one grommet
  • safety pins
  • small tags
Directions:
1. Use ruler to mark off inches and feet on jute webbing. Use permanent marker to number markings along left side of webbing. A stencil may be useful for this but I didn't have one available so I just freehanded it.

2. Write name along right side of jute webbing toward top. Again, a stencil might be useful here.

3. Use grommet tool to insert grommet at top of growth chart.

4. Package growth chart with safety pins and small tags for recording date and height.

Check out the original source, Whipper Berry, for more pictures of this simple gift idea.

Thursday, July 12, 2012

diy braided necklace

Good morning folks! Apologies for the belated post today, but I am pleased to announce that I have a post for you that does NOT contain butter or sugar! I know. Crazy, right? A gal needs a little break from butter and sugar every once in a blue moon. Plus, I made something pretty! :)

My friend, Maudie, and I were thrift shopping last weekend when I found the necklace below. I really loved the chunky chain link and the heavy weight of the necklace. But more than that? I really really loved that it was three dollars. Sold!

I just had to figure out what to do with it. Naturally, I went to Pinterest, where I found this DIY necklace and this DIY necklace and this really really ridiculously expensive necklace, all of which led to me rushing out to the nearest fabric store to stock up on embroidery thread.

Here's the step by step:


Step One: Gather your supplies. All you need is a chain link necklace, any color and length, and embroidery thread, any color. I know I have six packs of thread pictured here. I really didn't know how many I would need. I ended up using three total, two ivory and one peach, and it was the perfect amount for this shorter chain. Just FYI.


Step Two: Gather your thread together. I took each pack and cut it into eight equal lengths and bundled all three packs (so 24 total pieces of thread) together. This will really depend on the length and size of your chain though so use your best judgment. Then tie your thread around one end of the necklace.


Step Three: (not pictured because I got too excited to take pictures) Divide the thread into two bundles and braid the bundles through the chain link. You can kinda see in the picture above how I did this.

Alternately, you could also just leave the bundle as one and loop it through the chain link for a simpler look.

Step Four: Knot the excess thread at the end of the necklace and cut off remaining thread. Ta Da! That's it!

Mine took me maybe twenty minutes and cost me a total of $4. Not bad, huh? I love my neutral colors but I would like to do another with hot pink or neon yellow thread. Cute, cheap, easy...this is my kind of craft!

Friday, July 6, 2012

reupholstery: take two

the green monster
I said it would be a cold day in hell before I attempted reupholstery again. Well, guess what folks, the weather in hell must be cooler than Kansas because I've volunteered to assist my friend, Renee, with a new reupholstery project. I couldn't help myself. I somehow suppressed those memories of long nights pulling staples and volunteered myself as Renee's reupholstery life coach.

Oh, Katy, will you ever learn?

We found the above chair flea marketing the other day and absolutely loved the unique shape. The green crushed velvet? Not so much. I'm intrigued by this period of time when people felt that crushed velvet was the premier fabric choice for upholstery projects. I'm guessing that time probably coincided with a spike in hallucinogen drug sales. But that's just speculation.

Anyway, Renee and I have chatted about the end goal for this chair. She really wants a bright, fun print like the images below. We've also discussed painting the wood legs (which are in pretty rough condition) a nice, clean white color.

source: pinterest
source: absolutely beautiful things
source: graham and green 
source: kelly green interiors

I'm definitely pumped to see the final result. Considerably less pumped for the amount of work ahead for Renee and I. Thoughts?

Monday, April 23, 2012

reduce, reuse, recycle: garden stand


Happy belated Earth Day people! Today's post is in the spirit of Reduce, Reuse, Recycle...

This is the tale of an awkward little table that aspired to be something more than an awkward little table. A table that knew it had the potential to do great things. A table that wanted to move out of it's dark corner into a place in the spotlight.

The table above has had a long life. It was originally part of a display at Bath & Body Works. Then, it became my old roommates TV stand. She was ready to trash the thing during a move when I stepped in and adopted it. Since I've had it, it's been a jewelry stand but it had potential to be so much more.


So, recently I made a Home Depot run and picked up a couple pieces of plywood, some L-brackets, and a can of white spray paint. An hour later this guy had a new lease on life as my new garden stand! This awkward table is moving up in the world!


My previous forays into gardening have been met with failure after failure. Last year, I acquired some heirloom tomato plants as well as some basil. Both died before June due to the freakish Kansas heat. This year, however, armed with a climate controlled apartment and mild Rhode Island weather, I'm adamant that my thumb will finally become green.


I decided to start with a simple herb garden. Baby steps, people. Plus, herbs are something I use in my cooking all the time so having a constant fresh supply is pretty ideal. Here's the layout, from left to right: chives, cilantro, and rosemary. My most recent addition is a basil plant (below) and I have intentions to plant some mint next to the chives as soon as I can find some. 


So, keep your fingers crossed for my little herb garden. If it thrives...or at least survives...I have big plans for pesto, fresh salsa, mojitos, and more! Stay tuned...and go recycle something! :)

Wednesday, April 18, 2012

chair project: reconstruction


Without further adieu...the big reveal! Here's the "before" shot again to remind you of the mustard crushed velvet atrocity that was this chair. And....


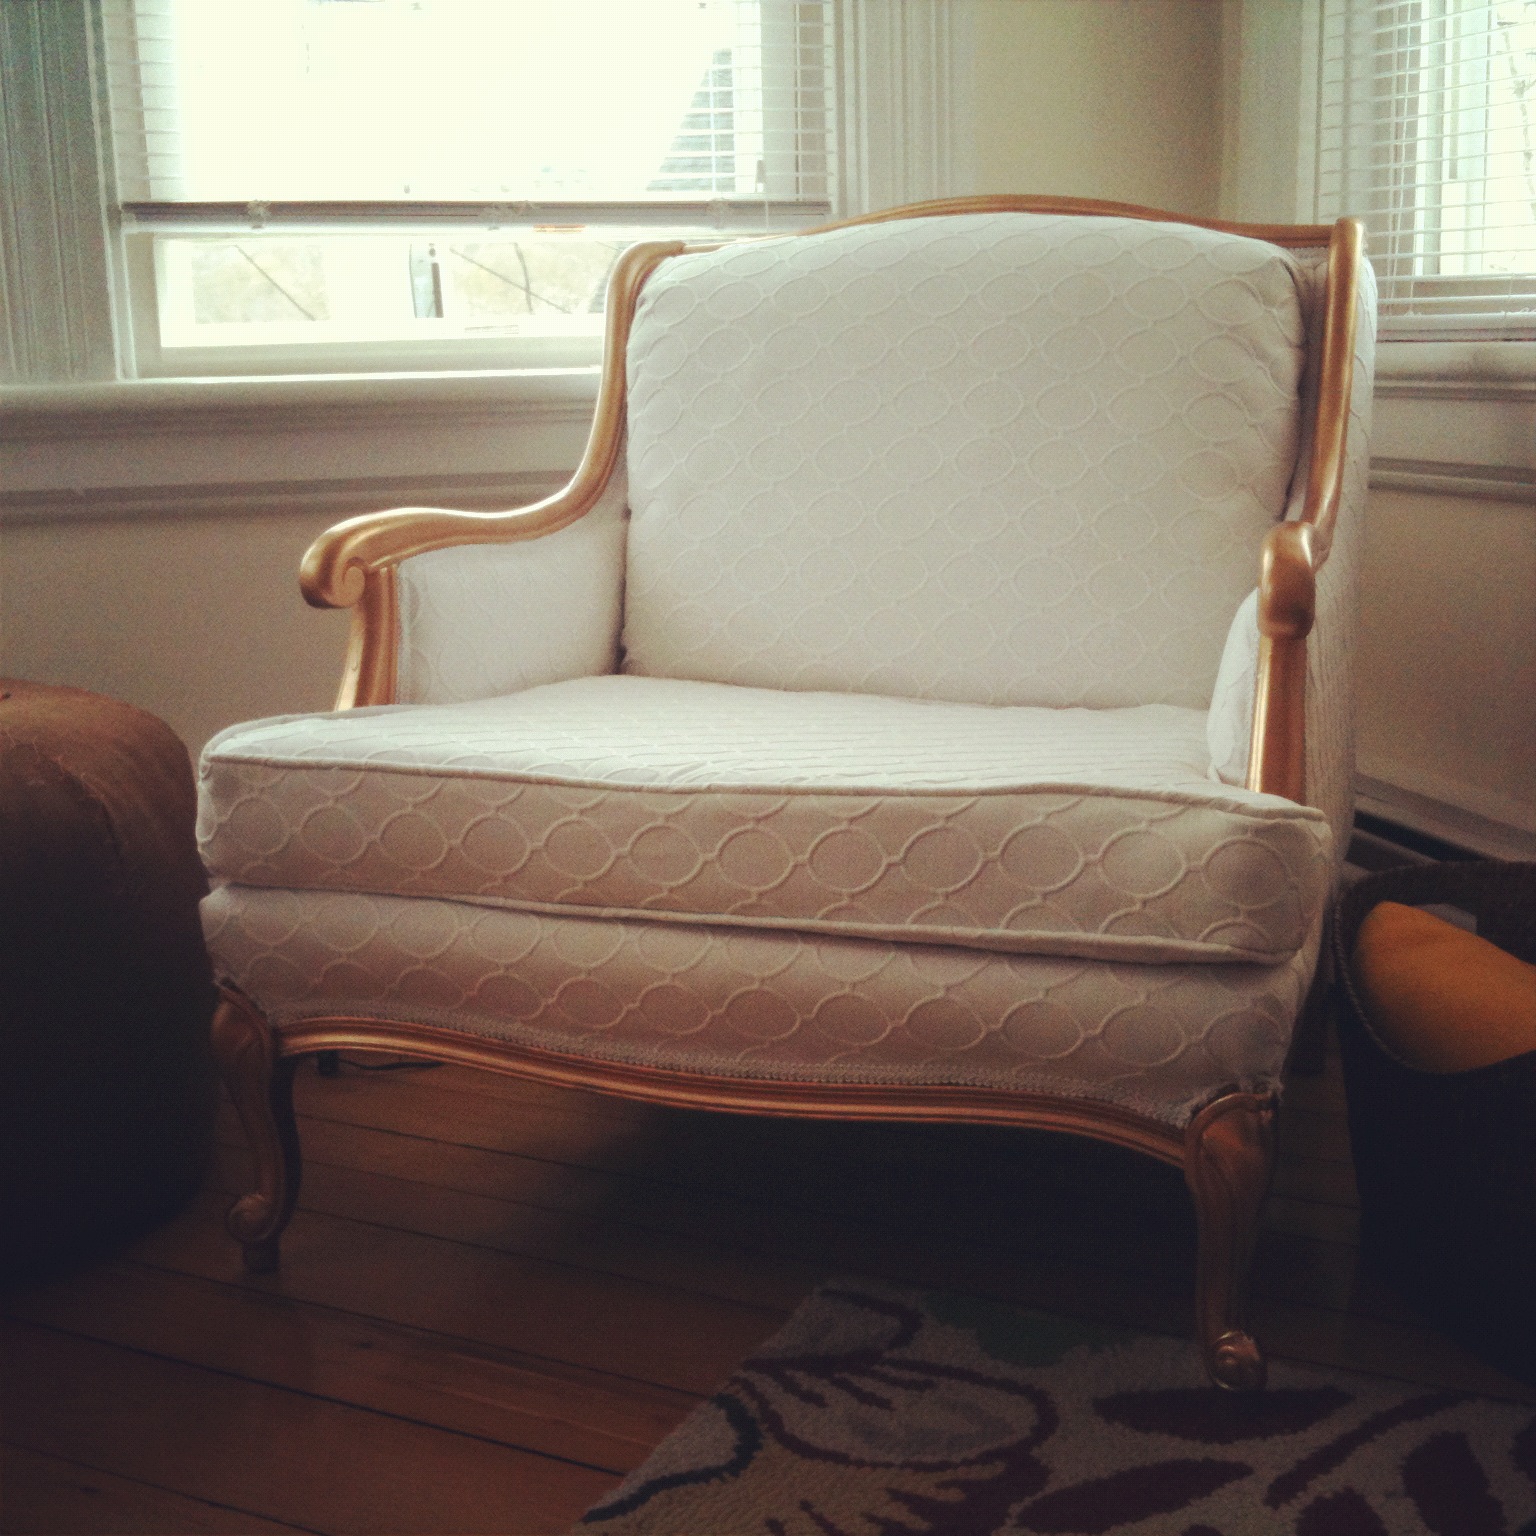
The "after"!!!! I love decorating with white so I chose a white material with a circle pattern. It was a bit of a splurge (more on that below) but totally worth it. I also refinished the frame of the chair. I liked the original wood, but it was not in the best of shape. So...gold it was! I'm so happy with the results...but it was a learning experience to be sure.


Things I've learned about upholstery:

1. Patience is a virtue. It is a loooong process. True, I worked on this chair sporadically, but it is definitely not a project you can expect to do in a day or two. Just removing the original fabric took me countless hours. I'm fairly certain those staples were from the devil. Ultimately, I ended up just ripping off most of the fabric because those staples were impossible to remove. Don't be like me.

2. Supplies are not cheap. Thank goodness the chair was cheap, because supplies began adding up quickly. The fabric alone was $40/yard from Joann's (thank goodness I had a 50% off coupon!). I found that upholstery fabric is quite a bit more expensive than most fabrics. However, I wanted to ensure that this fabric would last a while so I splurged for the better quality. On top of fabric, I also had to replace the cushion. I originally thought I'd be able to use the original but it was disintegrating and I felt like I needed a shower just touching the thing. Yuck! Anyway, cushion padding is pricey as well! Other than those two things, most other supplies were fairly inexpensive and I made a buddy at the local upholstery shop who sold me a few products for basically nothing. Score!

3. Upholstery is a "learn as you go" kind of process. I could tell you step-by-step exactly how I completed this project. But, honestly, it wouldn't be very helpful because every piece of furniture is different. My suggestion? Take boatloads of pictures as you go so you'll remember how the original was put together. I also saved and numbered every piece of fabric, trim, and stuffing as I went so that I could reference the original pieces if needed. And I was glad I did! However, I was even gladder to finally kick that skanky fabric to the curb. Yucky.

I hope this little reflection hasn't been too discouraging to those of you potential upholsterers. It was a very long, tedious process but the finished product made all the work worthwhile. Who knows? Maybe I'll take on another upholstery project one of these days. Maybe. ;)

Tuesday, April 17, 2012

chair project: deconstruction


A loooong, long time ago, I mentioned a chair project that I've been working on. It's been a long, slow process (that is still not 100% done), but I couldn't wait any longer...I had to show you the results of my reupholstery project!

I've been intrigued by reupholstery for a while now...ever since I love cute furniture that I can't afford. I have expensive tastes. What can I say? So, I decided to take matters into my own hands and MAKE a chair I loved.

You can see the "after" photo above. Didn't it turn out great?!? Haha! No. I'm kidding. That's totally the "before." I found this beauty on Craig's List and it cost me a whopping $30. I loved the unique shape and size. And this sucker is SUPER comfortable. However, mustard crushed velvet???? Those words should not even be in the same sentence together, let alone on a beautiful chair like this! It's a crime! So, I set out to right it.


Hands down, the worst part of reupholstery has got to be the deconstruction process.

Major Obstacle #1: There were literally thousands of heavy duty staples in this chair, most of which were stapled in so well that they were actually invisible through the fabric. After roughly three days of painstaking staple pulling (and serious consideration of getting a tetanus shot), I finally gave up and just began tearing the fabric off.


Major Obstacle #2: Even when you get so frustrated with the staple situation that you start tearing off the fabric like a woman possessed, you have to be super careful not to ruin the original material. Yes, even though I was determined to incinerate that nasty fabric as soon as humanly possible, I still had to use the pieces as a guide for cutting the new material. Yuck.


Now that I've bitched and moaned about what a pain upholstery is, I hope you're all feeling inspired to take on an upholstery project yourself! Haha, no, the worst part is over. Tomorrow I'll be back to show you the "after" shot. It turned out so great and was absolutely worth all the blood, sweat, and tears...and tetanus.

Monday, April 16, 2012

diy dyed toms

My old Toms.
How was your weekend? I tried to be productive...but this amazing weather just makes my brain reject school work. So, instead I did crafts! Downside: now I have to cram a weekend's worth of homework into one evening. Upside: I have lots of craftiness to share with you lovely folks this week! Yes, my priorities are in line. Why do you ask?

First thing on the agenda this weekend? Dying my old Toms. I have had my Toms for years now and they've definitely seen better days. When I originally purchased the pair above, they had been hand painted. You can still see the remains of that paint job on the elastic band. Yeah, I paid extra for the hand painting. Don't remind me.

As one might imagine, these suckers got nasty after a while and I was finally forced to toss them in the washing machine. It did take out the dirt and grime...but it also took out the color! I was left with an extremely faded and sad looking pair of Toms. Boo hoo.

Shoe bondage.
I haven't really worn my Toms much since the Washing Machine Incident of 2010. It's hard for me to talk about even now. (tear) So this weekend I decided to give these babies a new lease on life. A good dye job can work wonders my friends.

For this pair, I wanted something bright and fun, but dark enough to cover up the old color. I chose iDye brand dye in the Kelly Green shade. If any of you are considering doing this (or any other dye projects), I definitely recommend that brand. They have TONS of colors (like at least seven shades of green!) and it comes in a nice little packet that you just toss in the water. So easy and the color ended up being a perfect match to the color on the package.

So I tied those babies up (to give them a tie dye effect) and gave 'em the plunge...

Kelly green Toms!
Here's the after. I absolutely love the color and I like that it only absorbed into the actual material, not the sole, elastic band, or tags. Perfect, no? I can pretend that I did that on purpose but it's totally a happy accident. I also like that you can see the pattern of the original paint job, but it just adds to the tie dye effect. So cute!


If you want to dye your Toms...or anything else for that matter, just follow the directions on the dye package. The only step I added was binding them up in twine beforehand to create the tie dye effect, but that's totally optional depending on the look you're going for.

I should warn you though...once you dye one thing, you may be hooked. I'm now scouring my apartment for other things to dye. This could become a problem...I've already been eyeing a pair of white jeans and some white bathroom rugs that are practically begging to become a new (and improved) color. I might need a professional intervention. Just saying. I also dyed something else in this batch but that project will have to wait for now...

Now go dye something, fool!

Thursday, April 5, 2012

cake topper pom poms

Source: 100 Layer Cake $20
You may recall that I posted about these cake toppers a few weeks ago. These super cute cake toppers are just crepe paper pom poms on bamboo skewers. I love the colors and the look of these; however, $20 for nine bamboo skewers and a few pieces of crepe paper seems a bit outlandish, if you ask me. So, I set out to see if I could recreate these cake toppers. While my results are not an exact replica, they still turned out so cute that I decided to post the tutorial here.


Here's what you need: tissue paper in your color of choice, bamboo skewers or lollipop sticks, string or floral wire, and hot glue. My supplies cost me something like $5 and provided enough materials to make dozens of cake toppers. Now that's a good deal!

Step One: Cut eight pieces of tissue paper. Mine were roughly 3x3" but I didn't measure. You don't have to be exact; it's fine to just eyeball things here. Now stack those pieces of tissue!

Step Two: Fold the stack of tissue paper accordion-style and grab a small piece of string or floral wire.

Step Three: Hold the tissue paper accordion in the middle and cinch with either string or floral wire. Be sure to knot it as tight as possible. Floral wire would probably work better for this, but I used what I had. Note: At this point you might want to trim the ends of the accordion into a point or a rounded edge depending on what look you're going for. I did a couple plain pom poms and one with pointed edges and I ended up liking the pointed pom the best.

Step Four: Pull the layers of tissue apart and fluff to create desired look.

Step Five: Hot glue pom pom to end of skewer. Voila! Cake topper pom pom!

So pretty!
I made three hot pink pom poms and it took me a total of about 15 minutes from start to end. Unfortunately, I didn't have a cake to stick these beauties in, but you get the idea. Super cute! These pom poms would also be cute in cupcakes for a party. They'd also make for fun drink stirrers for a shower or BBQ. These little pom poms have so much potential!

Hope you like! Happy crafting!